ORDER ENTRY FUNCTIONS

1 – Order Entry (option # 1 on the main menu)
This is where orders are entered to create a picking ticket.
2 – Order Edit / List (option # 2 on the main menu)
This is where orders that are already entered may be edited (changed) or merely listed for your review.
3 – Pick Ticket Exceptions / Invoicing (option # 3 on the main menu)
This is where orders are edited prior to invoicing (when necessary) and then invoiced.
4 – Invoice Entry (option # 4 on the main menu)
This is where you may create a direct invoice (no picking ticket).
5 – Credit Memo Entry (option # 5 on the main menu)
This is where you may create a credit memo.
6 – Backorder Entry (option # 6 on the main menu)
This is where you may enter backorders directly into the system without creating a picking ticket or force items to backorder that are in stock.
7 – Restart Suspended / Pending Orders (option # 7 on the main menu)
This is where you return to an order that has been suspended (for later completion), orders that may have crashed, and orders that are pending for various other reasons.
8 – Backorder Edit / Inquiry (option # 8 on the main menu)
This is where you verify backorder status of an item, get an ETA, etc. You may also edit (change, cancel, etc.) backordered items from this menu option.
9 – A/R Inquiry (option # 9 on the main menu)
This is where you inquiry on an accounts receivable item or customer’s balance.
10 – Product / Stock / Inquiry (option # 10 on the main menu)
This is where you inquire on various aspects of an inventory item, i.e. availability, price, customer cost, ETA of backordered items, etc.
11 – Order Inquiry / Reprint (option # 11 on the main menu)
This is where you may inquire on an order using various criteria
. This is also where you may reprint/fax/email an order, invoice, or credit memo.
12 – Customer Name / Inquiry (option # 12 on the main menu) This is where you may inquire on a customer by using various criteria (name, city, state, zip).
13- View A/R Statement (option #13 on the main menu) View and/or print a customer’s
statement.
**- SPECIAL OPTIONS Special options available from the FUNCTION prompt.
Select Order entry (option # 1 from the main menu)
At the ship to? prompt you may enter the customer’s account number:

Using a customer’s account number. When prompted for a customer number, simply type the number <enter>.

Using the customer’s name. When prompted for a customer number, enter a “?” <enter>. Then, at the name key prompt, simply enter part of the customer’s name<enter>. If only one customer matches your entry then that customer’s information will be imported directly into the order header. If more than one match occurs then all customers those matches will be displayed and you merely select the appropriate one by typing the line number<enter>.

Using the city, state, or zip code. . When prompted for a customer number, enter a “?” <enter>. Then, at the name key prompt, simply enter a period (.) followed by the city <enter>. To inquire by state, enter two periods (..) followed by the state <enter>. The zip code may also, be used by entering three periods (…) followed by the zip code <enter>. Any combination of the sort items may also be used to narrow the field of potential matches, i.e. a city and state. Again, if more than one match occurs simply select the appropriate customer by typing the line number <enter>and their information will be imported directly into the order header.


Using the customer’s telephone number. At the ship to? prompt, type the customer’s phone number(with area code, no dashes are necessary) <enter>and the customer’s information will be imported directly into the order header.

Using the customer’s manufacturer ID. At the ship to ? prompt, type the manufacturer code comma ID number <enter> (example: TEC,S50611).

Order Header Information
Once the header information is displayed, you will be asked if there are any header fields you wish to change. If there are fields to be changed, you merely enter the field number (i.e. 1 to 10) and press enter. The cursor will move to the selected field for editing. Make the appropriate changes and press <enter>.

In addition to header changes (fields 1 through 10), you have various other options.


Order Header Fields
Field #1 Change this field if the order is being shipped to a location other than the default location. It is advisable to change this field when your customer’s customer is picking up the order as well. A good practice is to change the name line to the name of the individual or company picking up the order and the address line to “will call counter”. Doing so will automatically cause the program to remove all pricing from the packing list side of the pick ticket.

Selecting order header, field #1 for editing pops up the edit box.

At the “city” prompt, you can type a zip code instead of the city name and CODIS will look up the city and state for you.

Field #2 Change this field when you want to use an order type other than the default order type. See the “Order Types” help document for a further explanation of order type usage.

Field #3 Change this field when the shipping point of the order is different from the customer’s default shipping point.

Field #4 Do not change this field directly. If the shipping date is other than the current date then the shipping date should be changed by first using the “Future Delivery” order option (field #6).
Field #5 Change this field if the shipping method of this order is going to be different than the customer’s default shipping method.

Field #6 This is a flag field. Each order option can be toggled on or off as needed. It may be necessary to toggle on several order options to accomplish the required processing for an order. See the “Order Options” help document for a further explanation of order type usage.

Field #7 Change this field when the sales tax consequences for this order are going to be different than the customer’s default sales tax code. Changing this field is usually rare.

Field #8 Change this field when the customer requires a P.O. number be entered. If the customer requires a P.O. number then his/her customer record should be flagged accordingly and the program will automatically prompt for it. A customer record can also store a “blanket” P.O. number when appropriate.

Field #9 Change this field when the backorder code for this order is going to be different than the customer’s default backorder code.

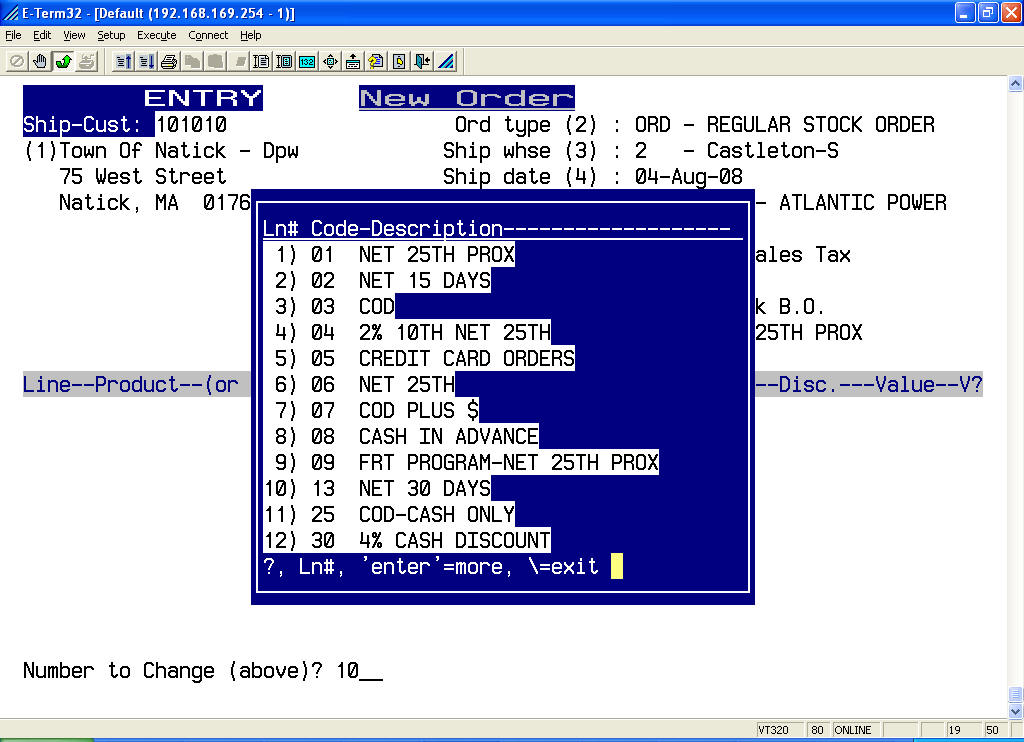
Field #10 Change this field when the terms code for this order is going to be different than the customer’s default terms code.
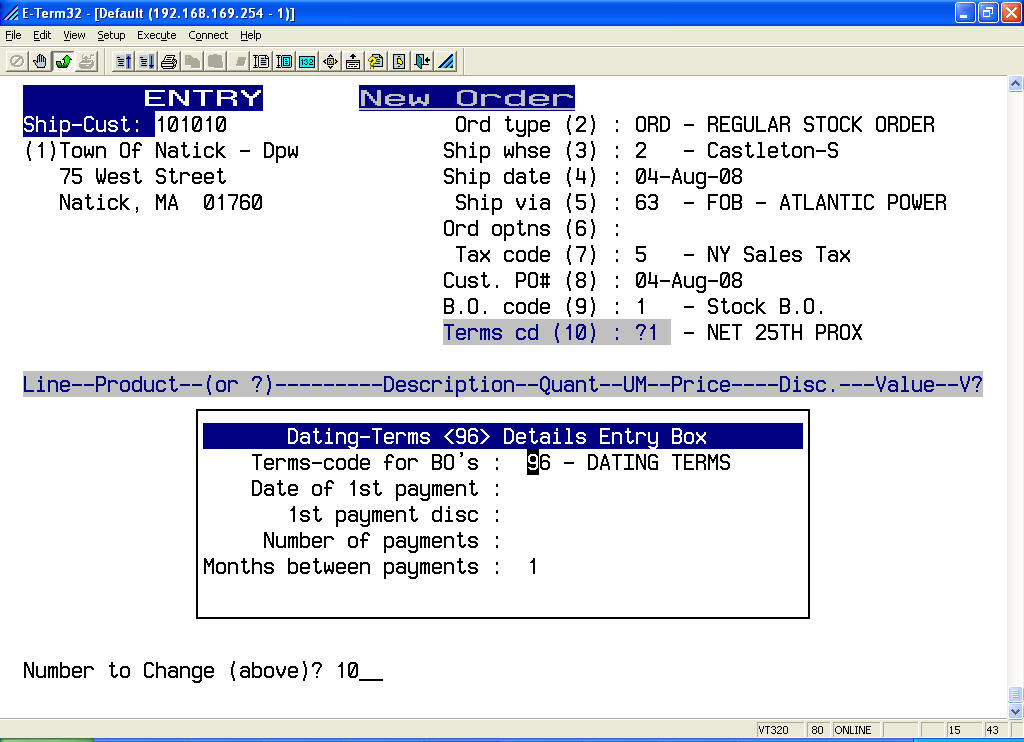
When a “dating” terms code is selected an edit box pops up so you can establish the
various elements of the dating terms such as date of first payment, first payment discount
date (if applicable), number of payments, and interval between payments (an interval of
1 means a payment every month).
Entering Part Numbers
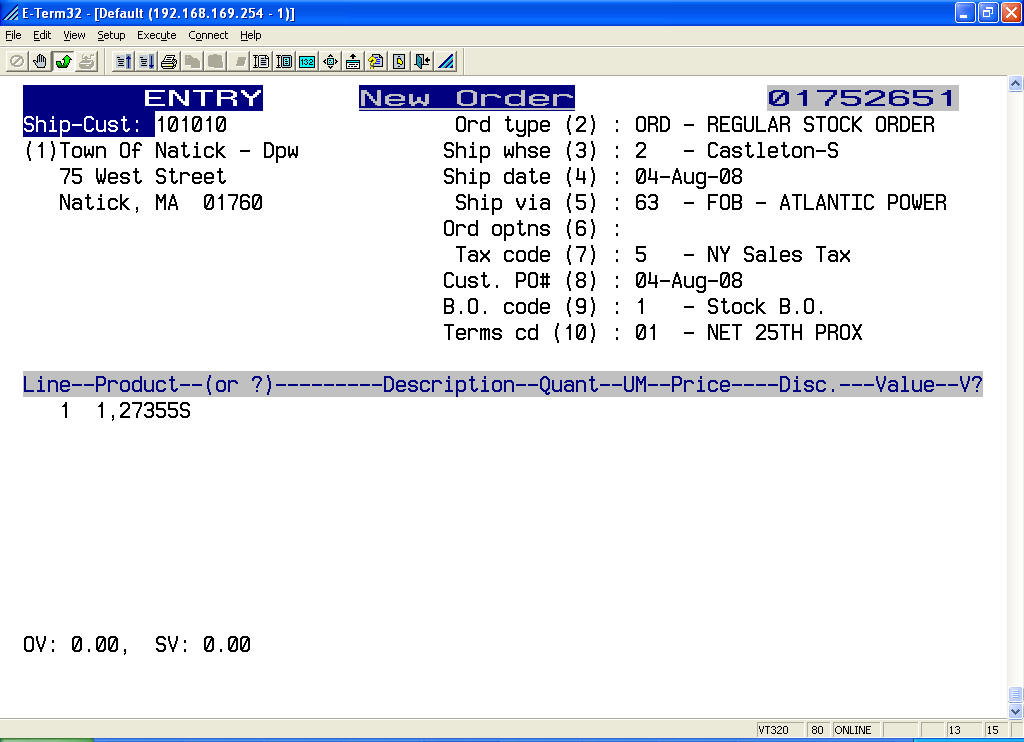
Part Numbers may be entered in either of the following ways:
Quantity,part number<enter> (quantity comma part number, no spaces. i.e. 1,26208<enter>).
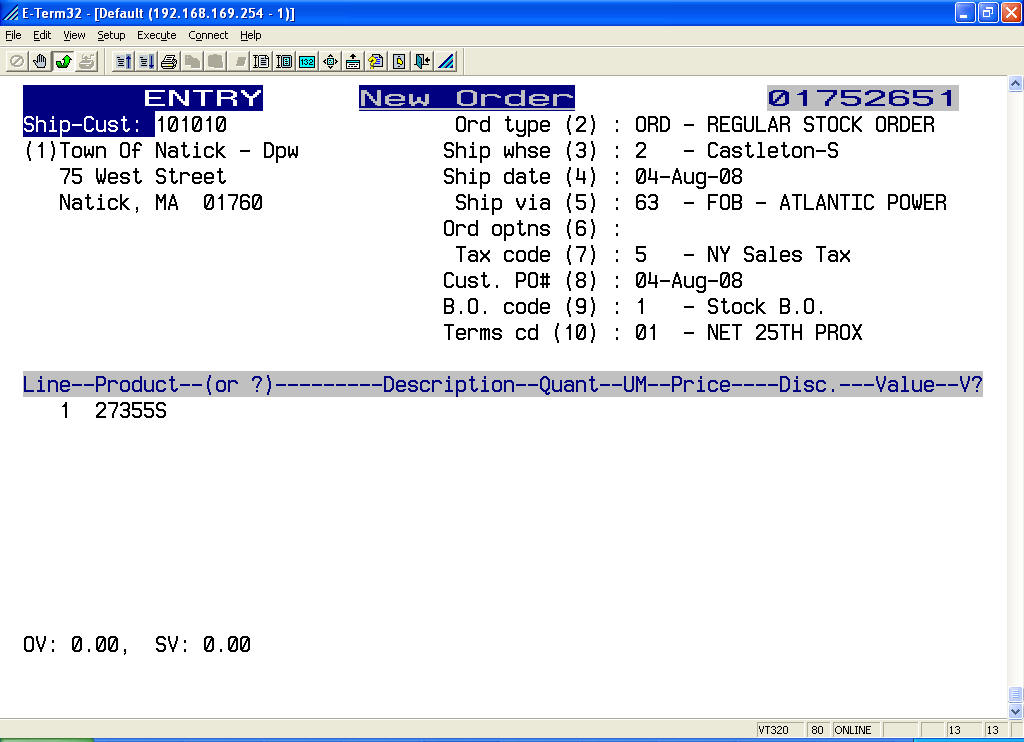
Part Number <enter>.
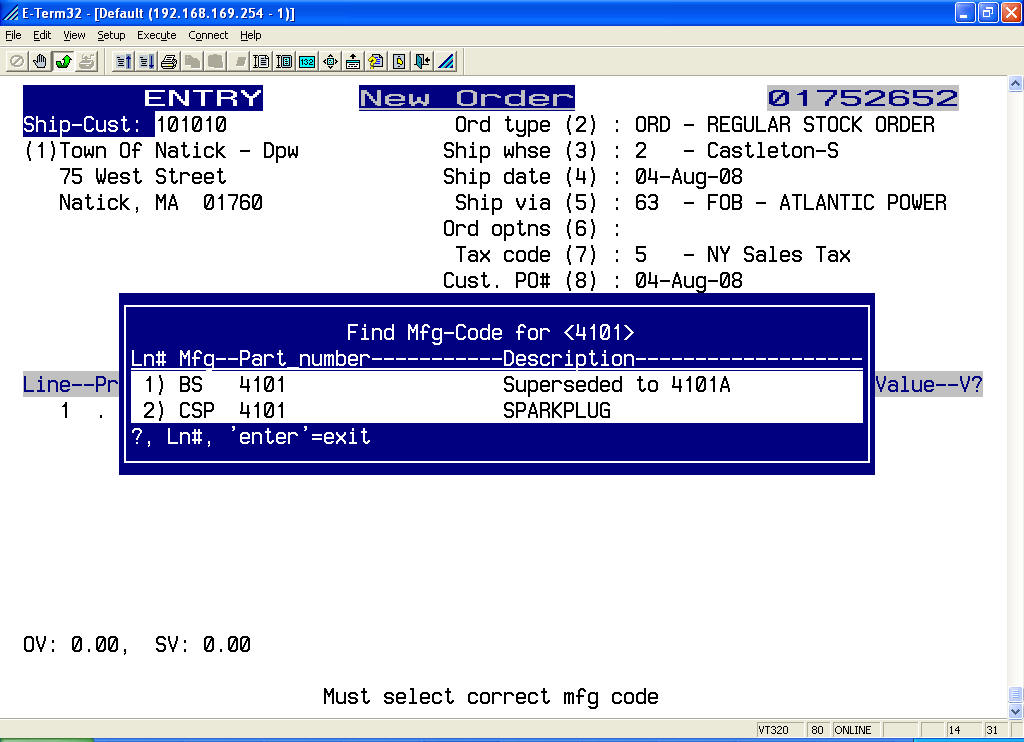
If a part number exists in more than one manufacturer then a popup box will display each one and the description for each. You can select the one you want by typing the “Ln#” associated with the correct manufacturer and part number.
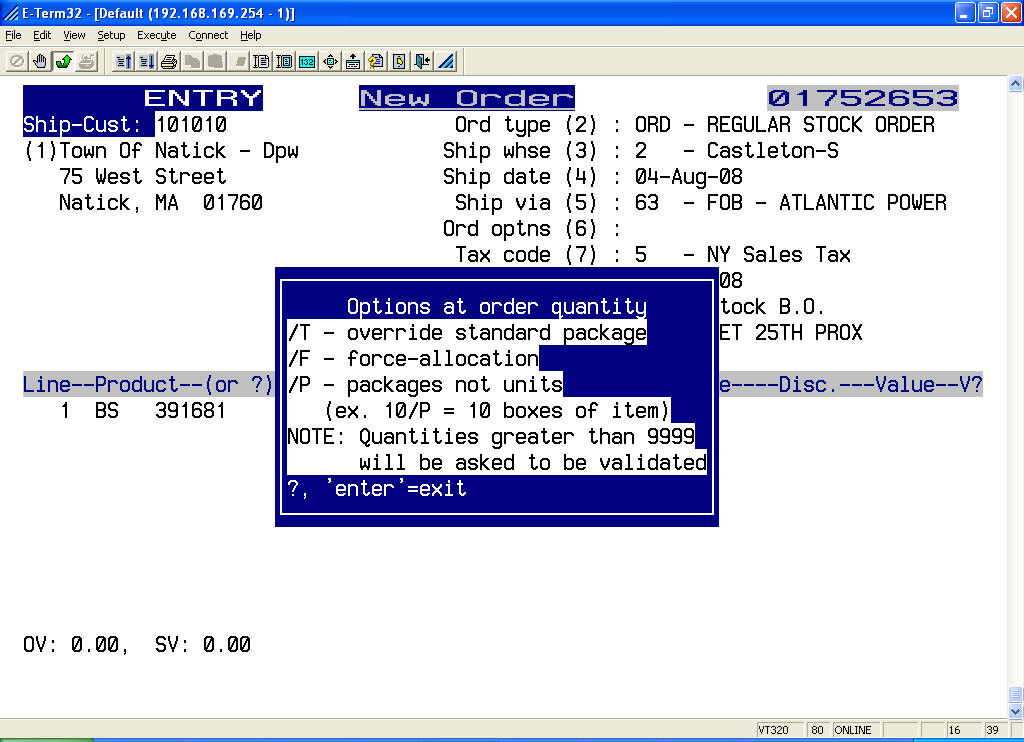
If a part has a sell quantity greater than 1 then the program will automatically suggest a standard selling pack equal to the quantity that is stored in the stock file record if you have this enabled. If the customer asks for multiple packages of a standard pack item then the quantity can be entered as “multiple/P”. If a customer asks for a quantity less than the standard selling pack then you can override the sell quantity by entering “qty/T”. Also, in times when an item is “out of stock” but you know you actually have the item (maybe the item just came in and hasn’t been received into the system) you can “force allocate” the items by entering “qty/F”. The force allocate function is most often password-protected, therefore you will be prompted for the password.
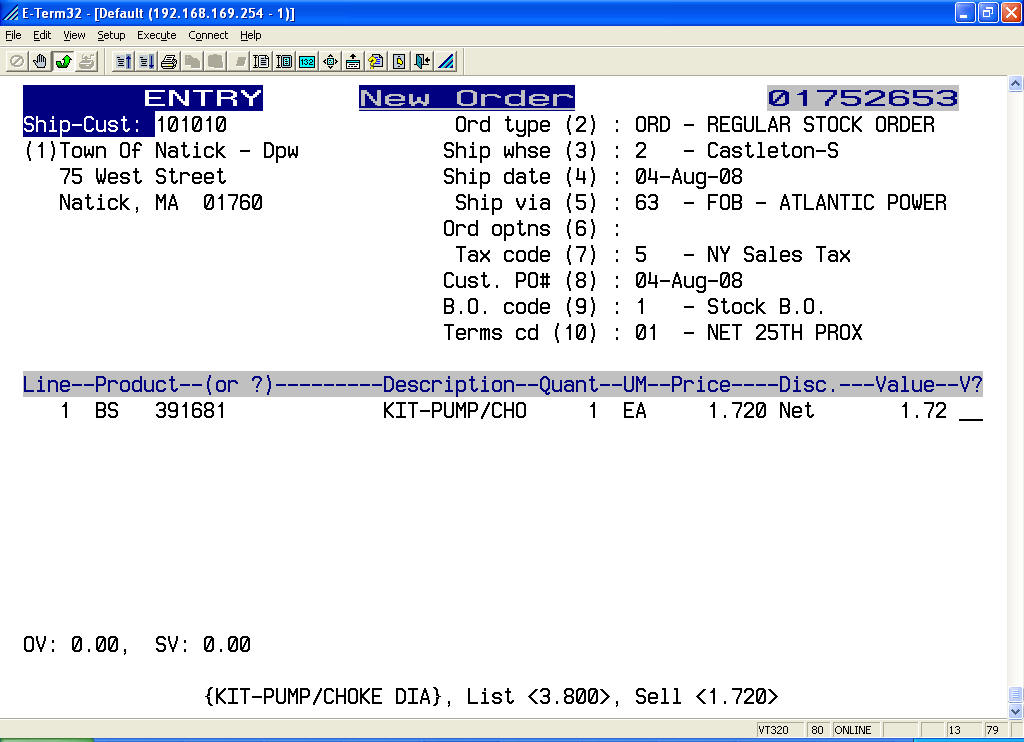
Once the part number has been entered, you are asked to verify the entry (at the end of the line). If all is correct, simply press <enter> or key the next part number.
Options at Part Number Entry Time
In addition to entering part numbers, there are several other functions available from the part number prompt.
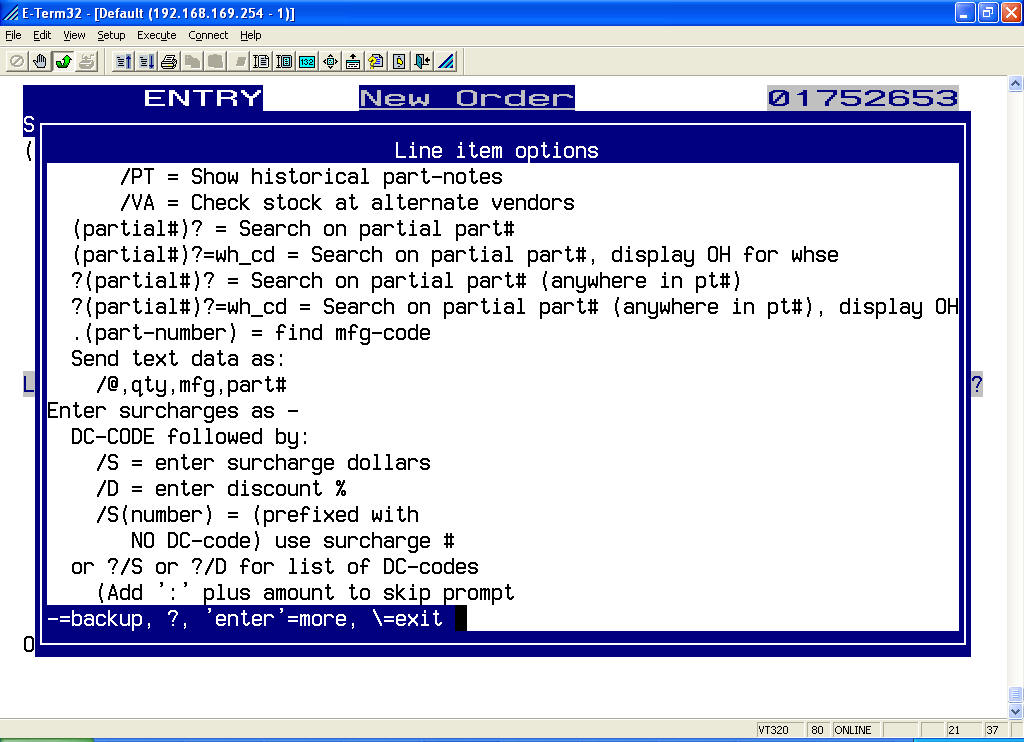
Functions that work in conjunction with the part number are:
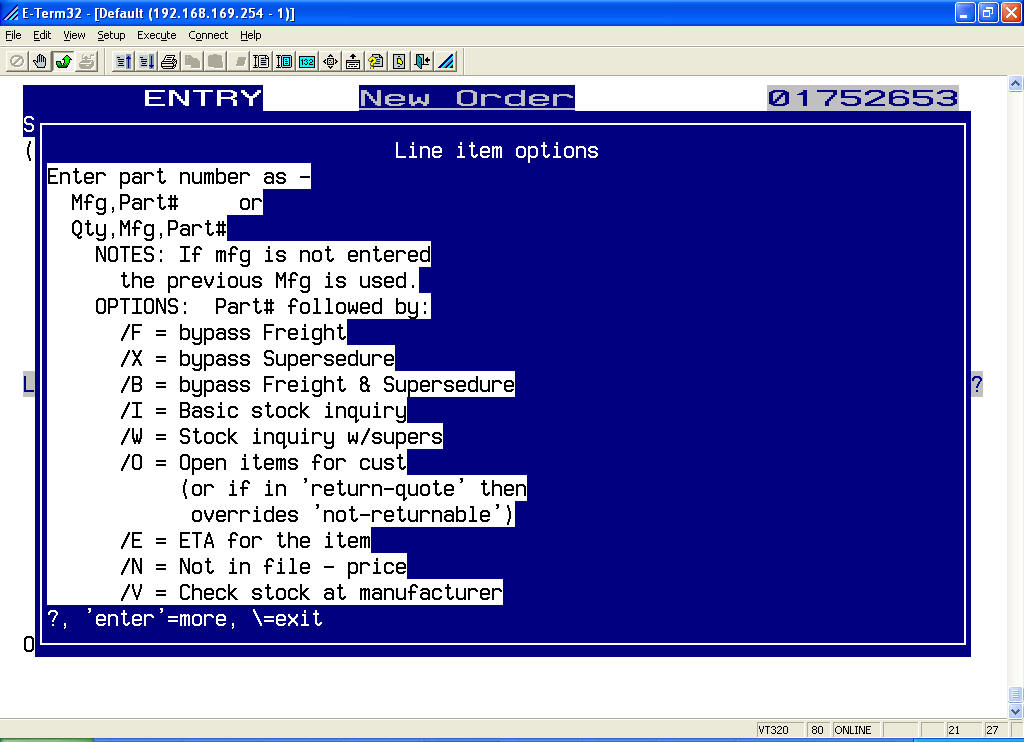
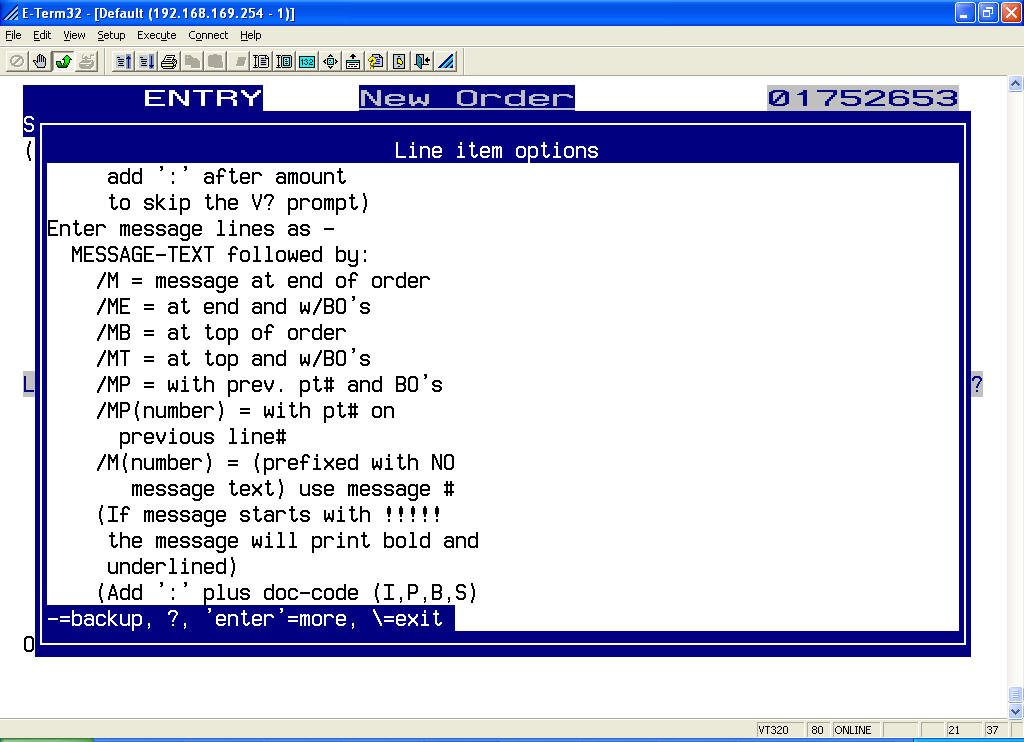
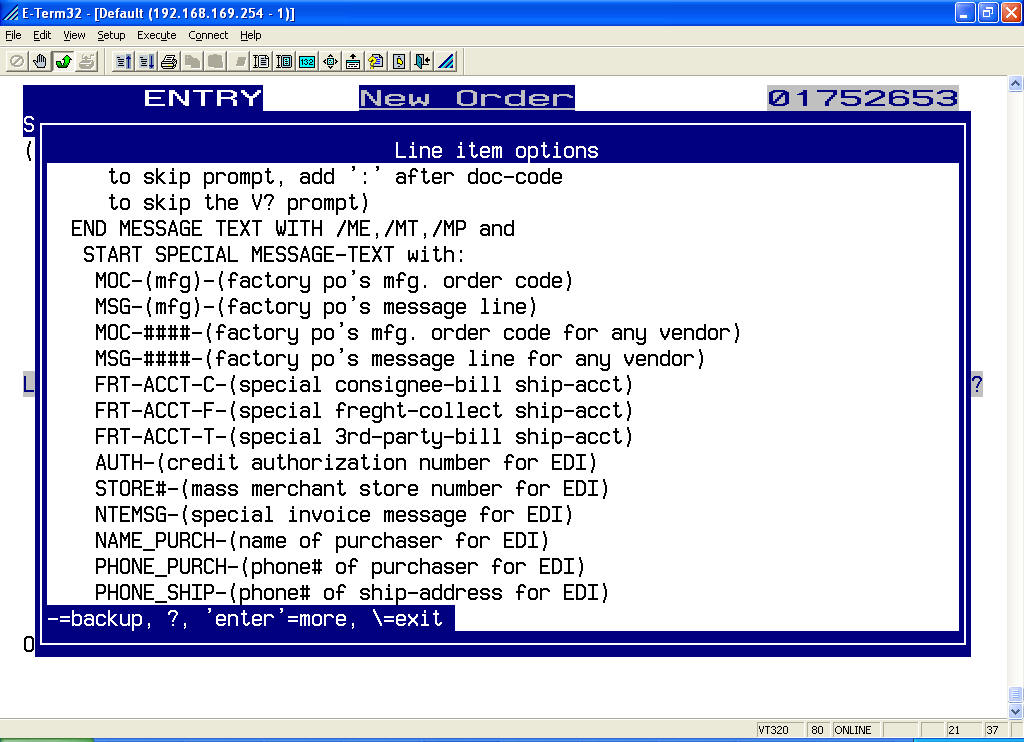
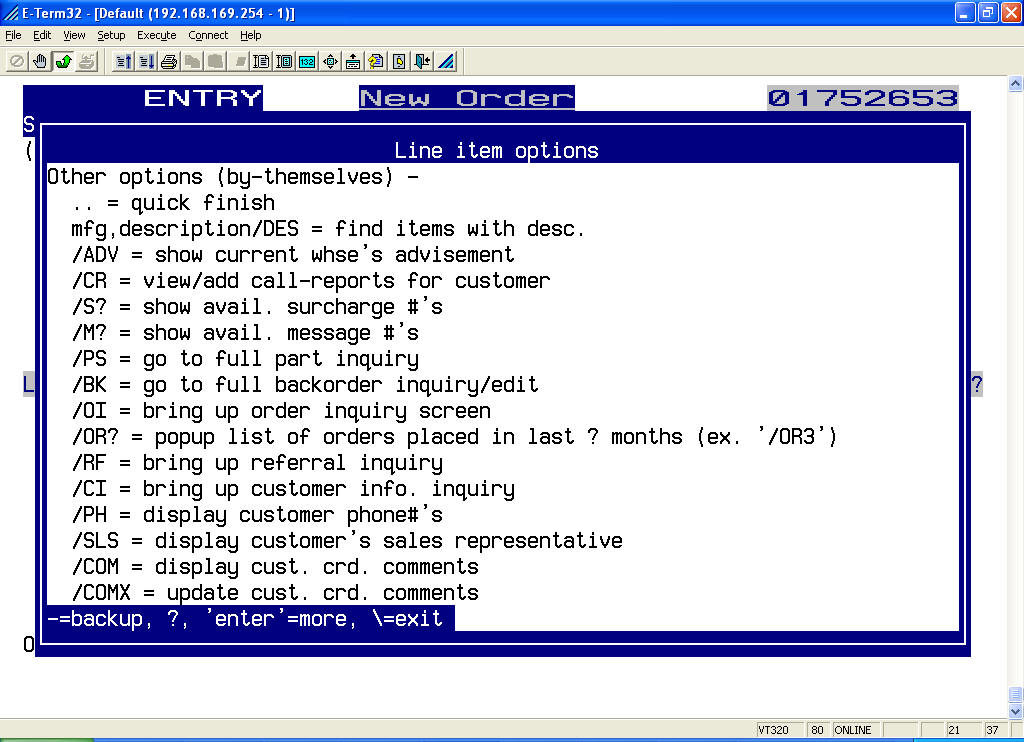
Functions that work independently of a part number are:
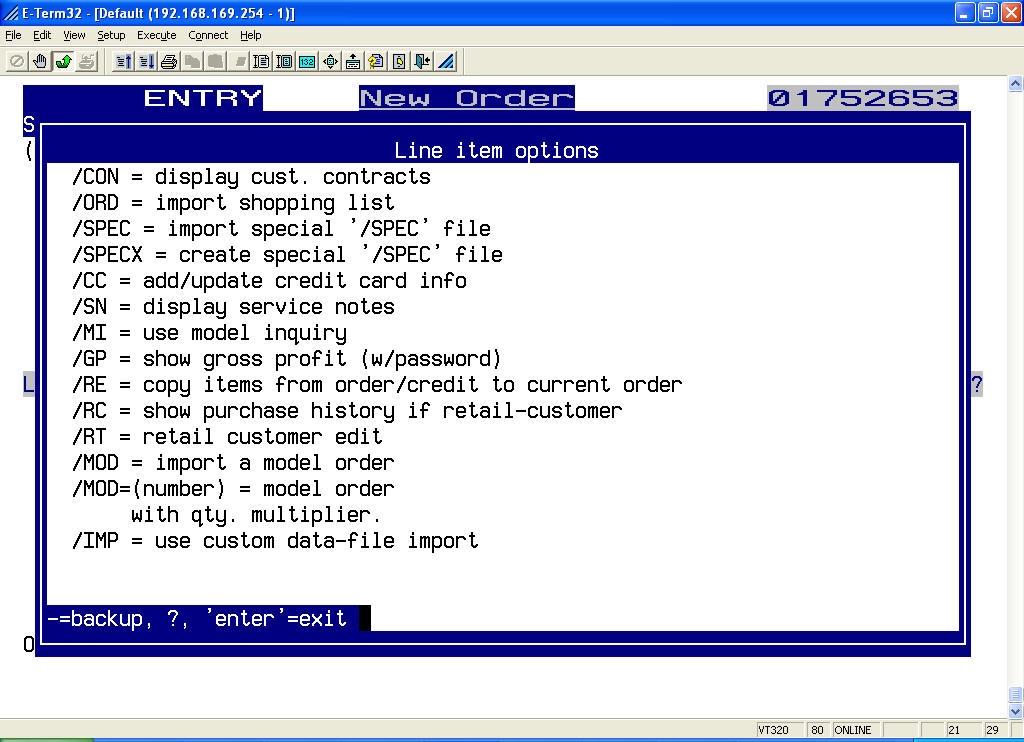
Changing Detail on the Part Number Line
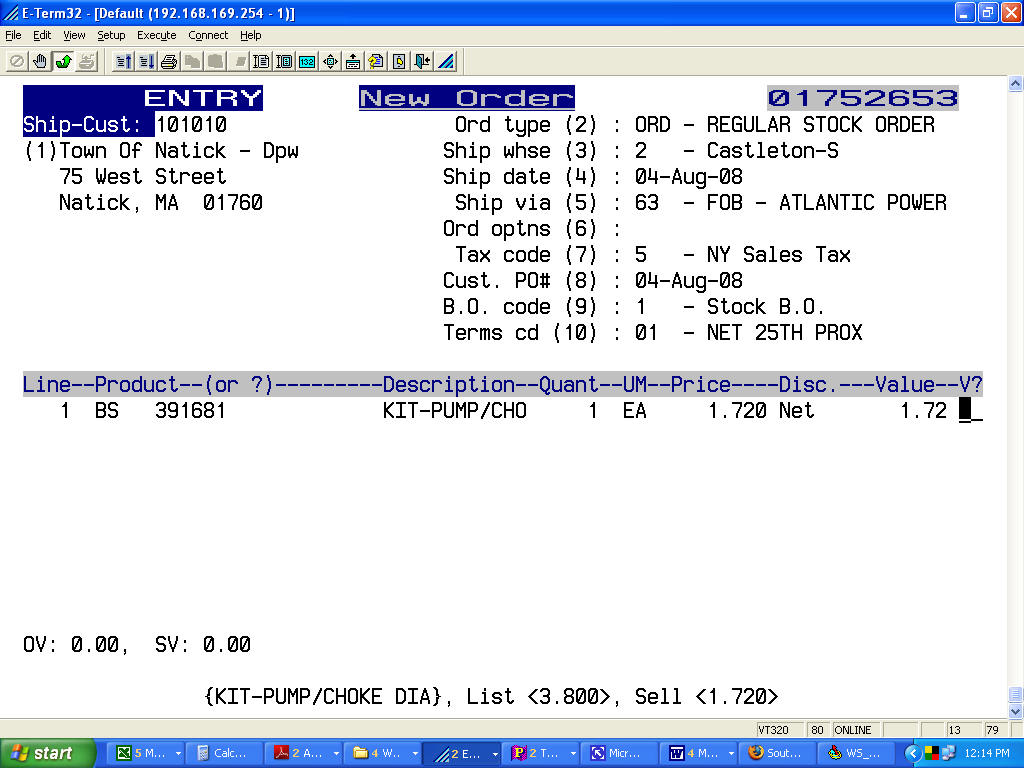
After the part number and quantity have been entered and your cursor is at the V? prompt, you have the following options:
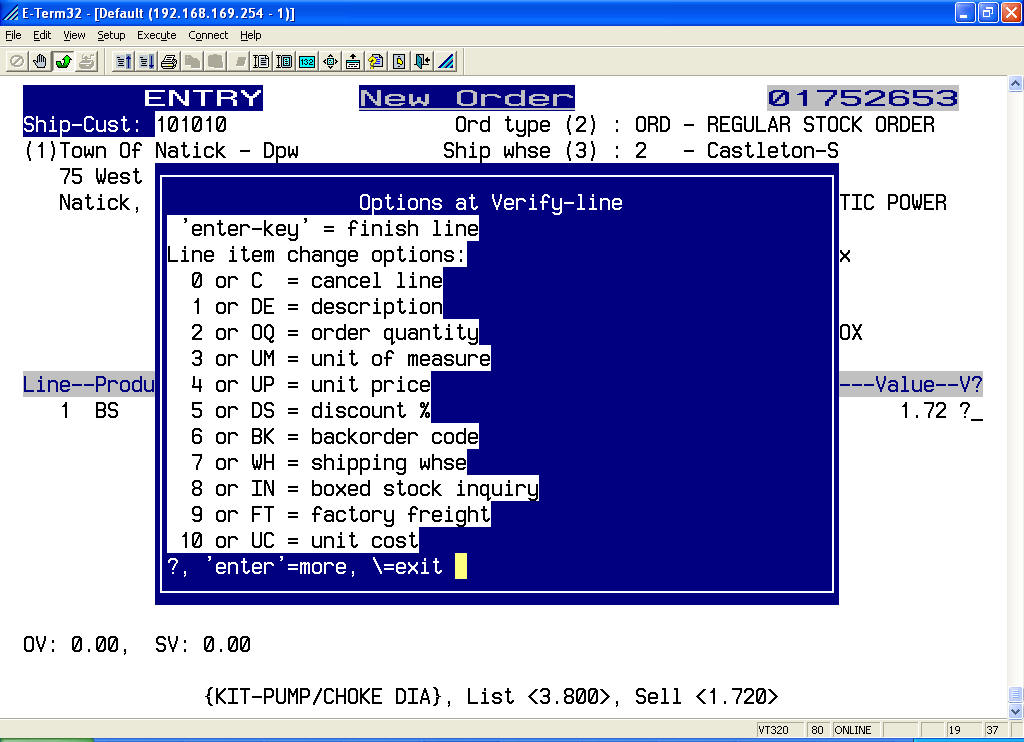
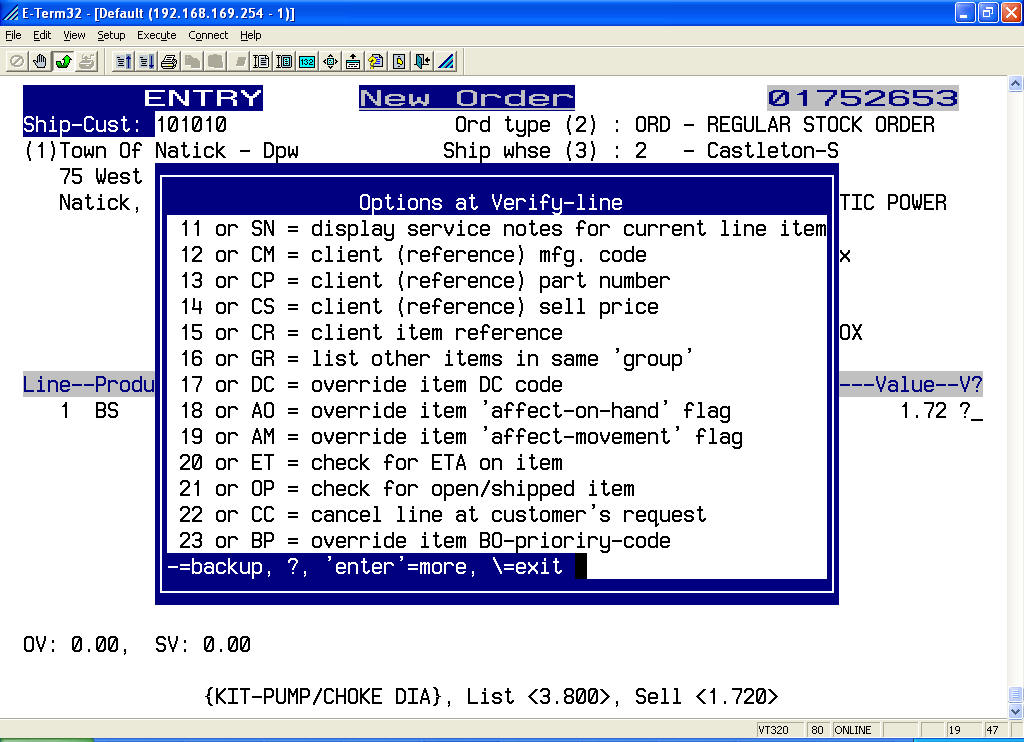
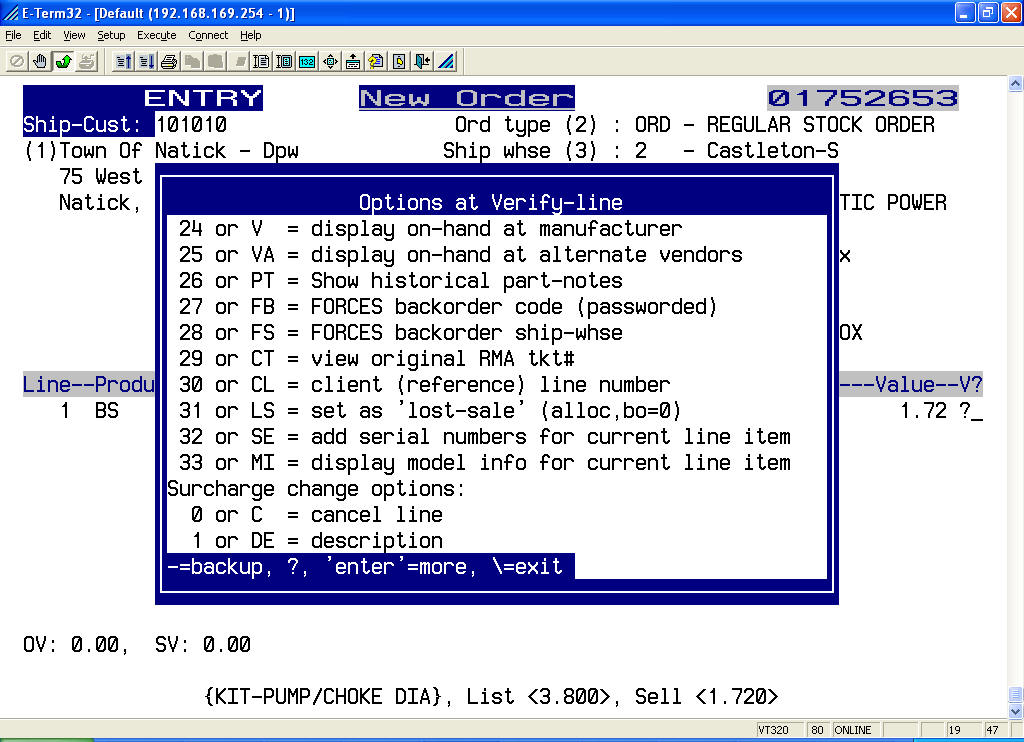
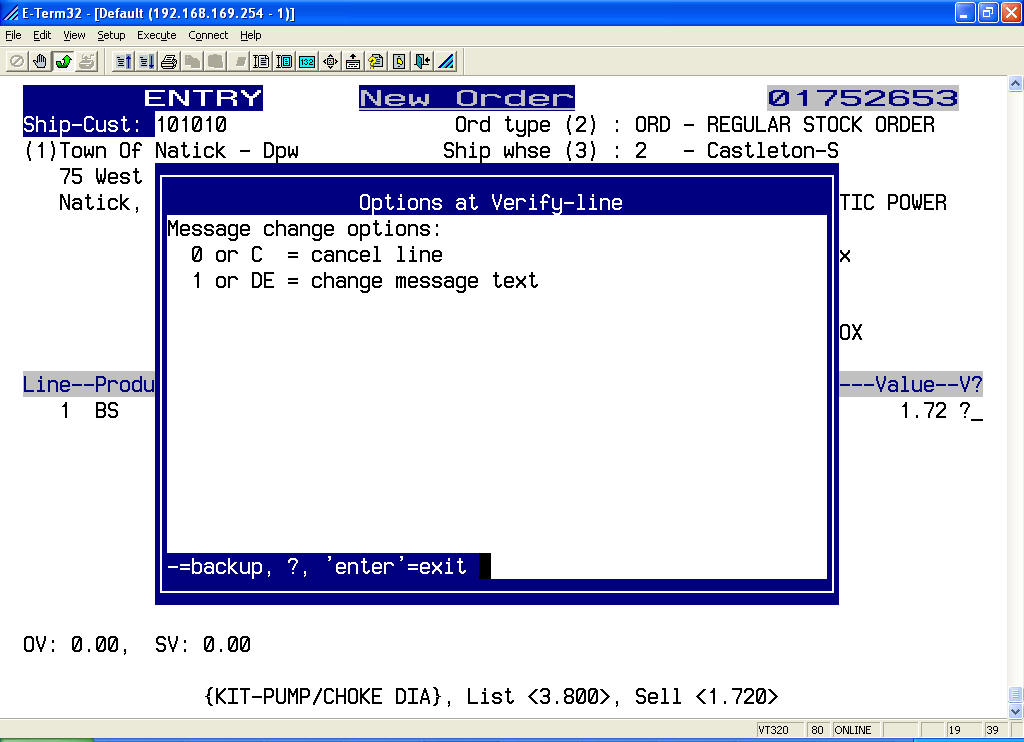
Entering Messages on the Order
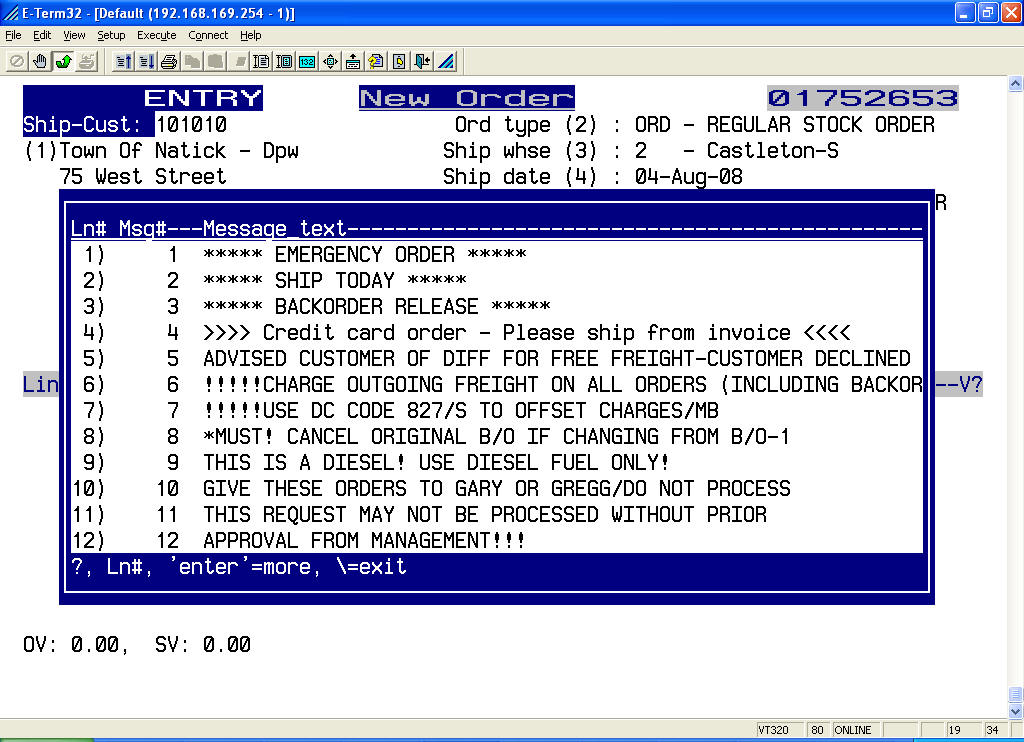
Messages are entered the same as part numbers however followed with a code, as indicated below:
· /M Text of message followed by /M <enter>
prints message at end of order
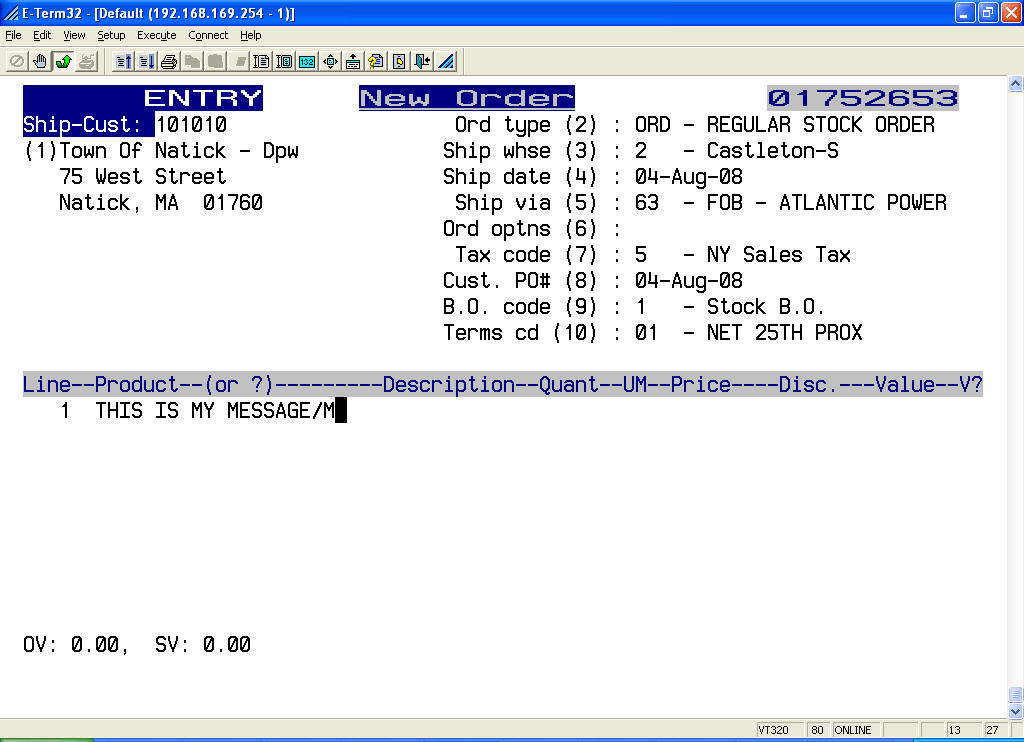
· /M(number)
Text of message followed by /M(number) <enter>
prints a pre-defined message
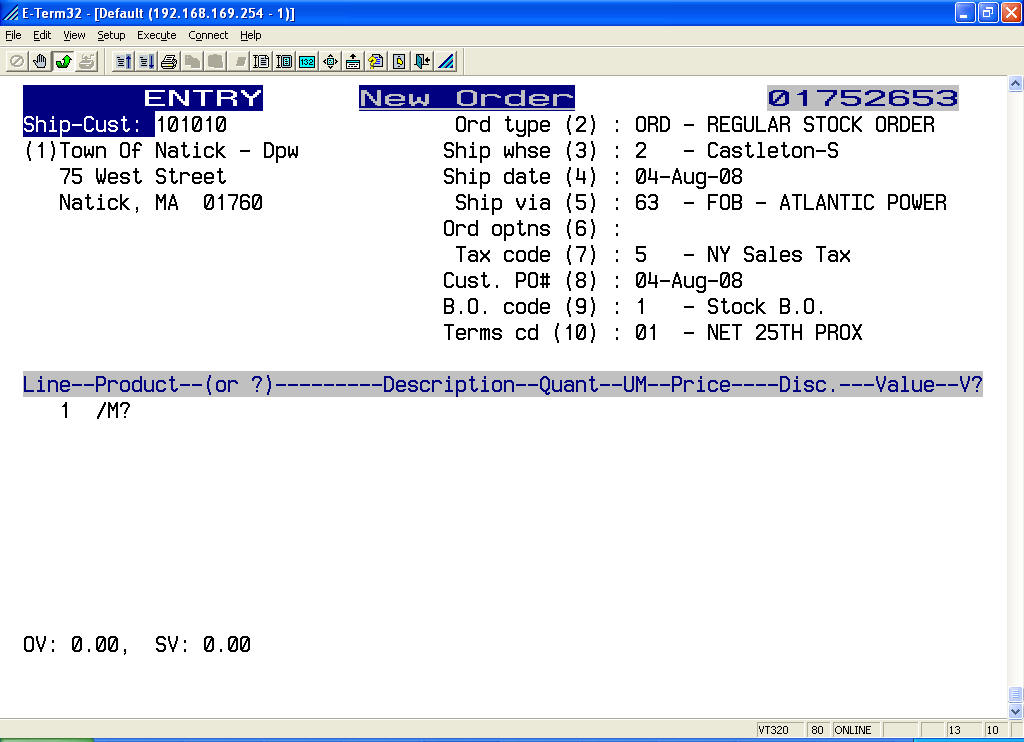

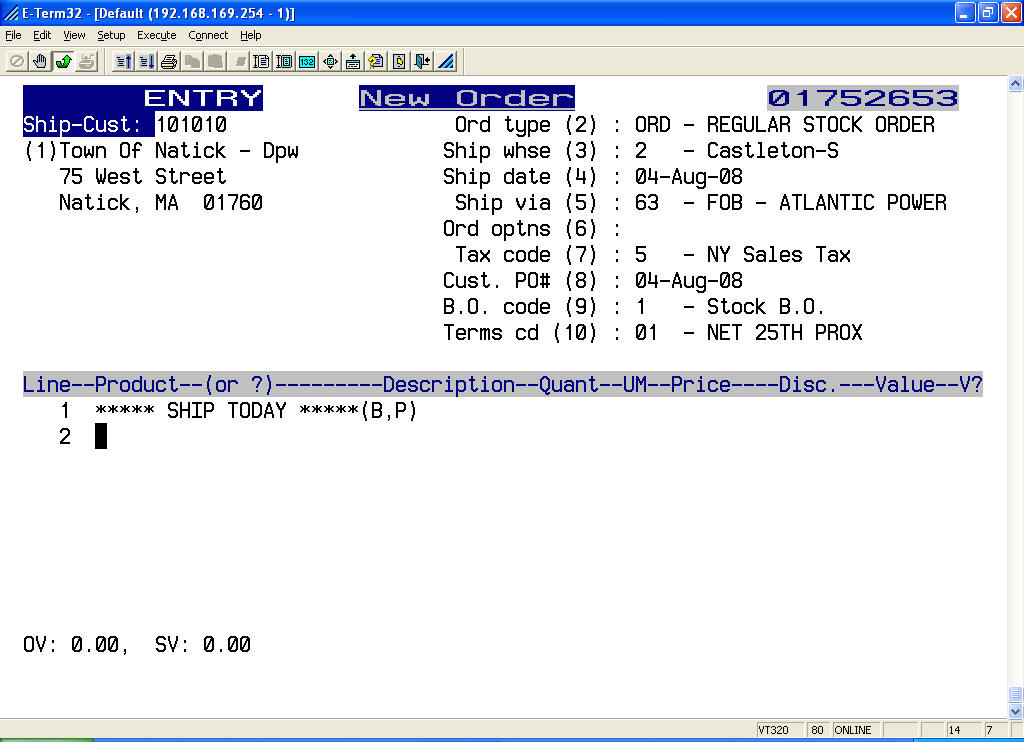
· /MB Text of message followed by /MB <enter>
prints message at top of order
· /ME Text of message followed by /ME <enter>
prints message at end of this order and any backorders
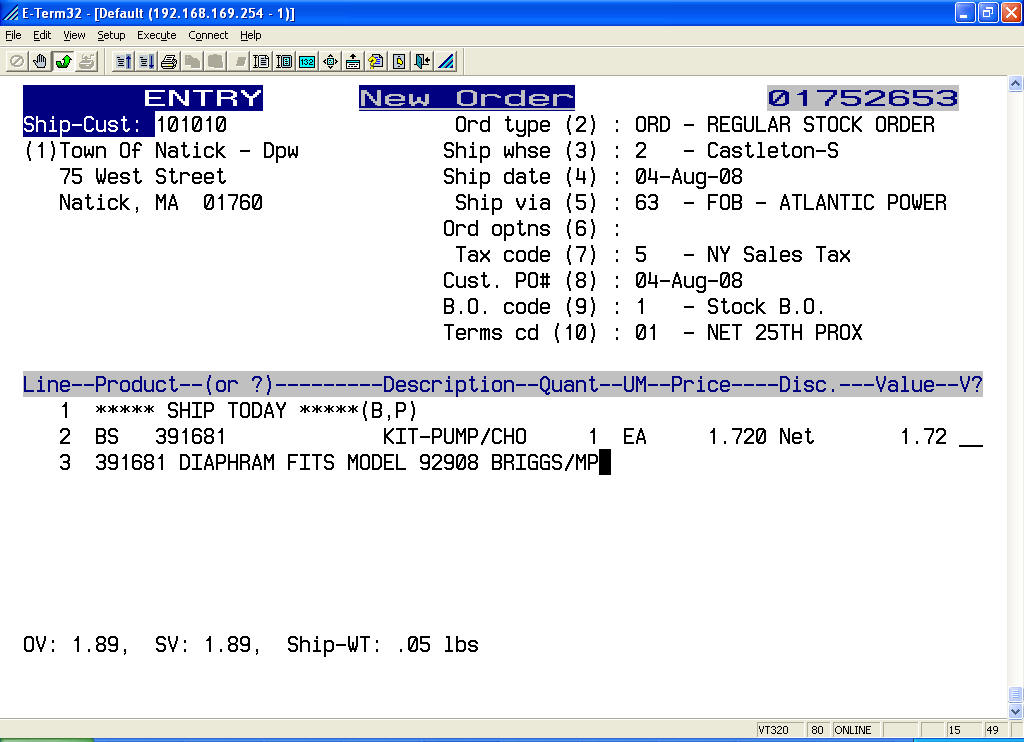
· /MP Text of message followed by /MP <enter>
prints message with previous part number and any backorders
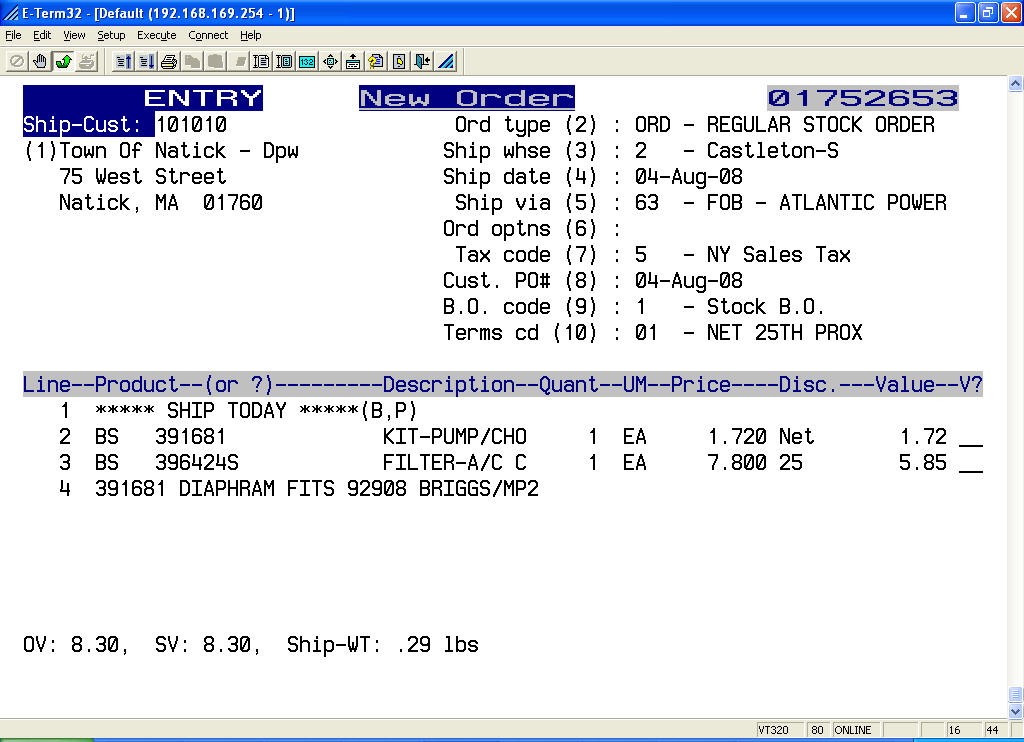
· /MP(number)
Text of message followed by /MP(number) <enter>
Prints message with part number on specified line number.
· /MT Text of message followed by /MT <enter>
prints message at top of this order and any backorders
Note: If a message starts with !!!!! (5 exclamation marks) then message will print bold, underlined, and with a larger font size.
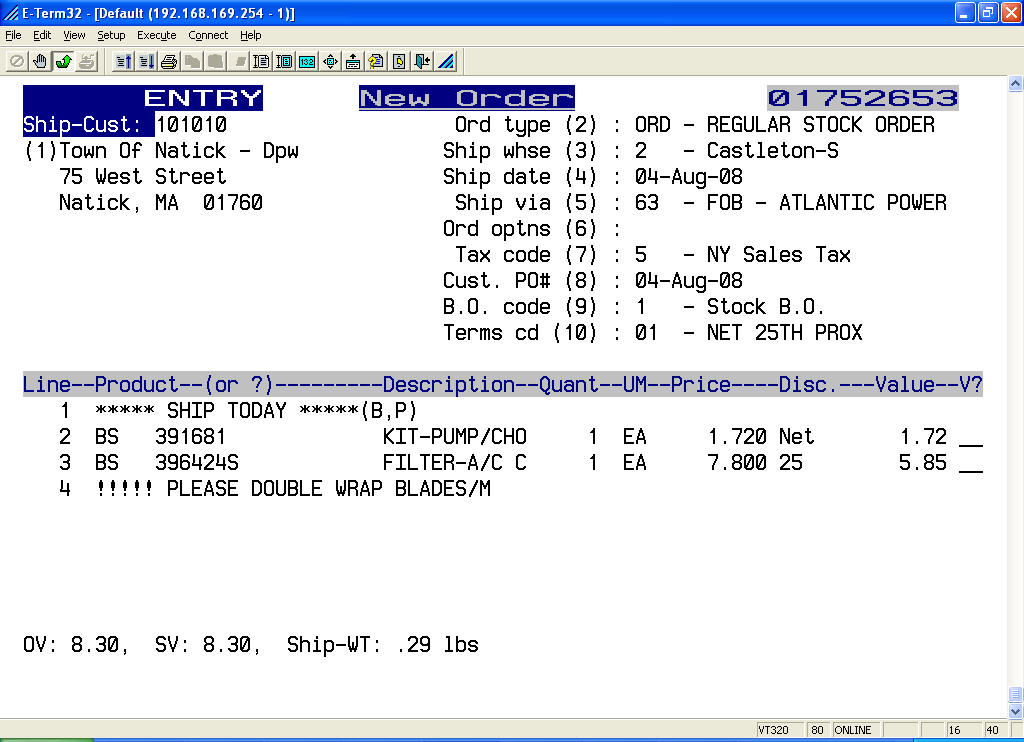
After entering a message, you have four message position options:
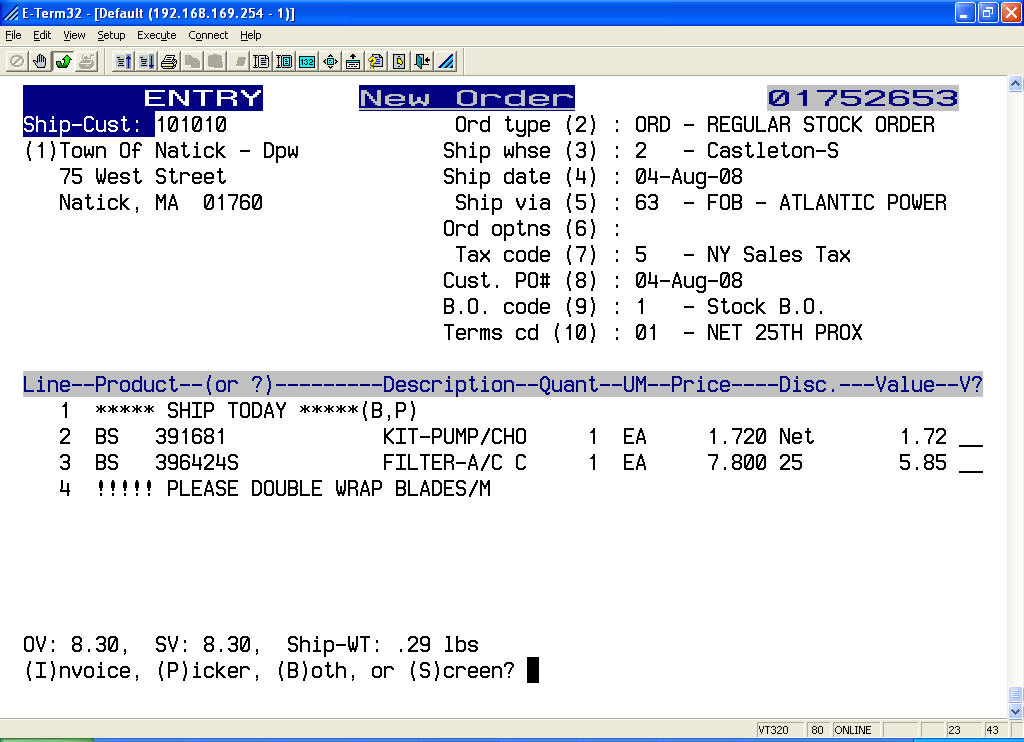
· I Print the message on the invoice only
· P Print the message on the pick ticket only
· B Print the message on both the invoice and pick ticket
· S Display the message on the screen only
Exiting the Detail Area of the Order
At the line entry prompt, press \ (back-slash) <enter> (a period or /E are also allowed in place of the back-slash).
Typing two periods (..)<enter> at the part number prompt will immediately finish and queue the order for printing.
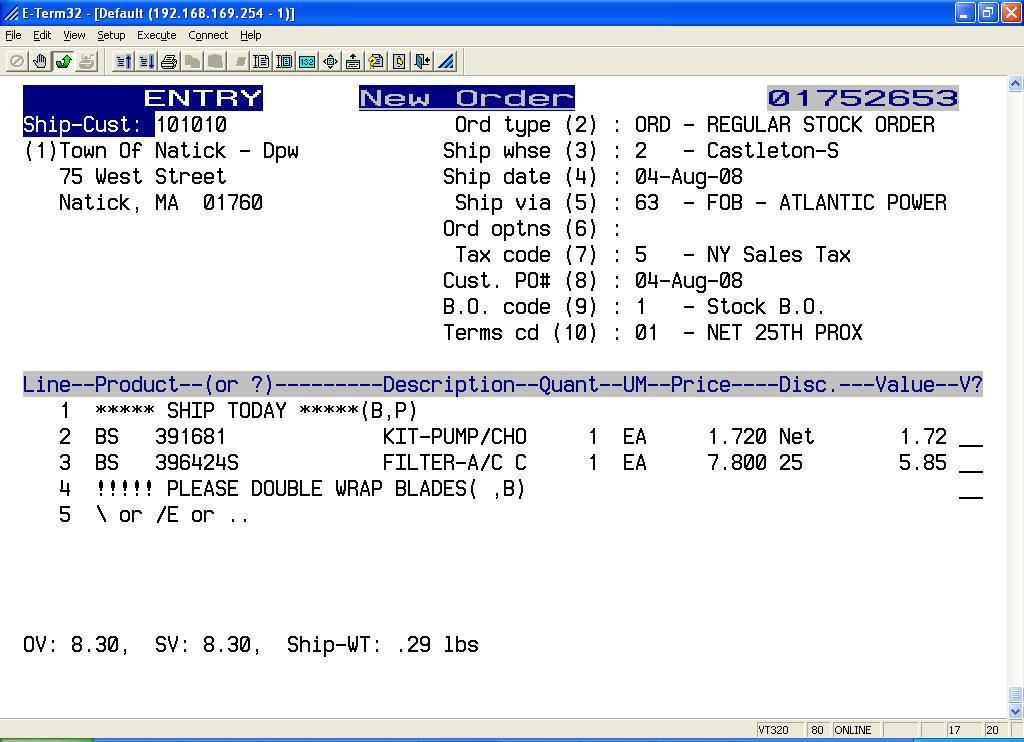
\ or /E <enter> will move the cursor the bottom of the screen. At the bottom of the screen, options available are:
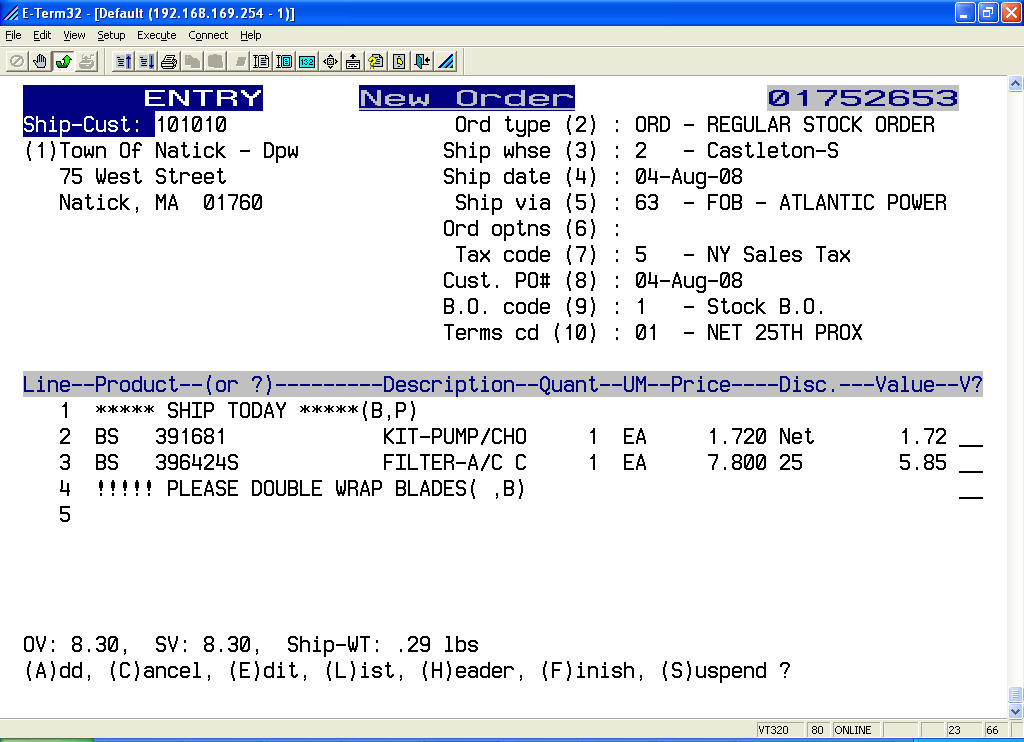
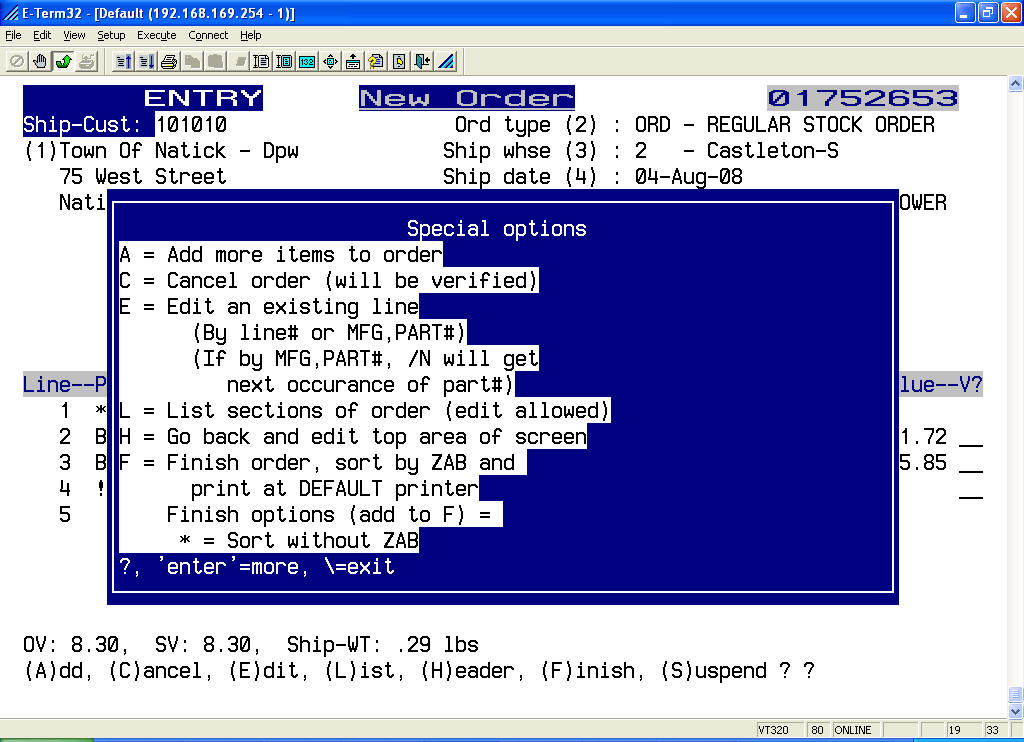
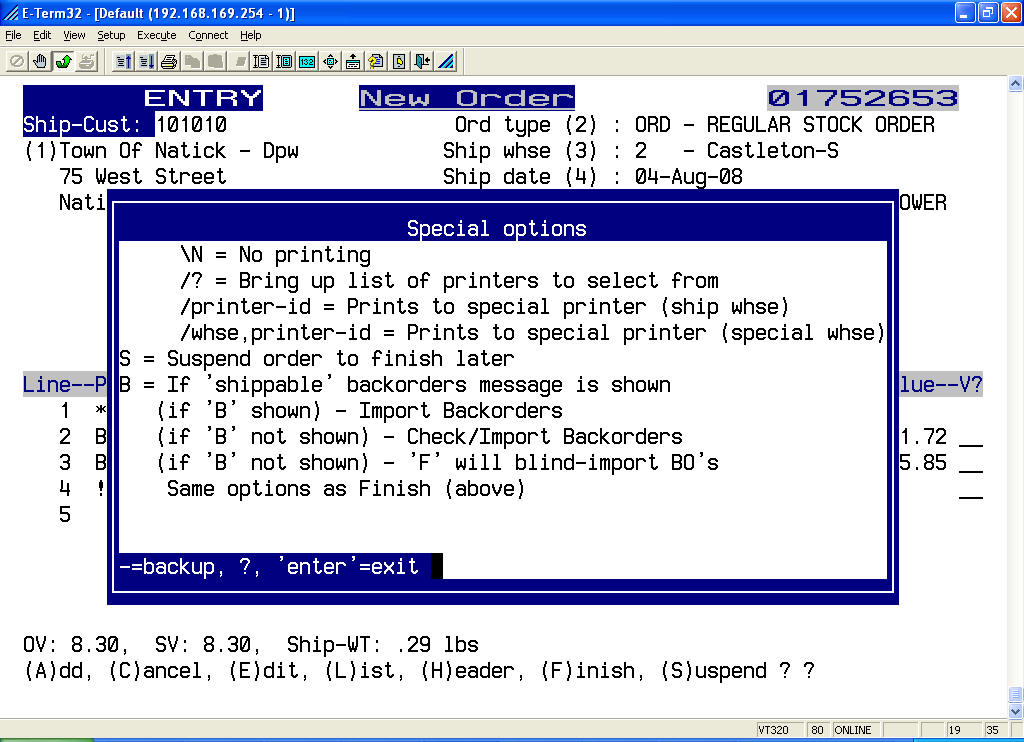
If there are no shippable items on the order, the system will display a message, switch to backorder entry by default, and no pick ticket will be printed. You can override this by typing N <enter>. The system will print a pick ticket for the order and you will need to confirm/invoice it even though nothing is being shipped.
Select Order Edit / List (option # 2 from the main menu)
At the password prompt, type the order edit password and press <enter>.
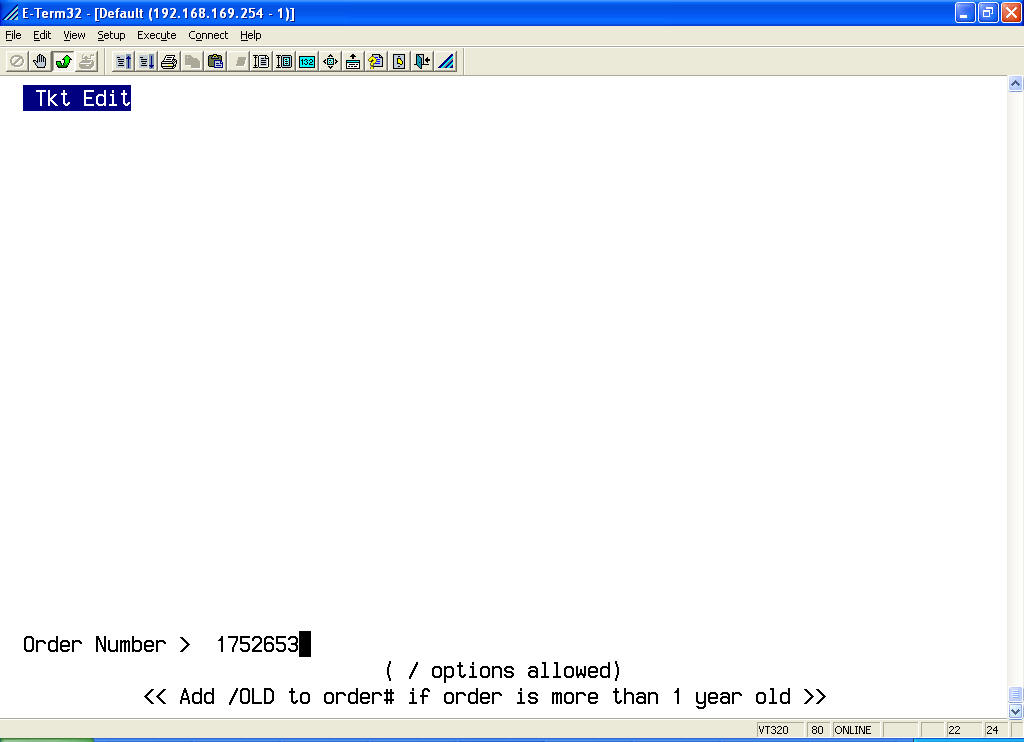
At the order number prompt, type the order number and press <enter>.
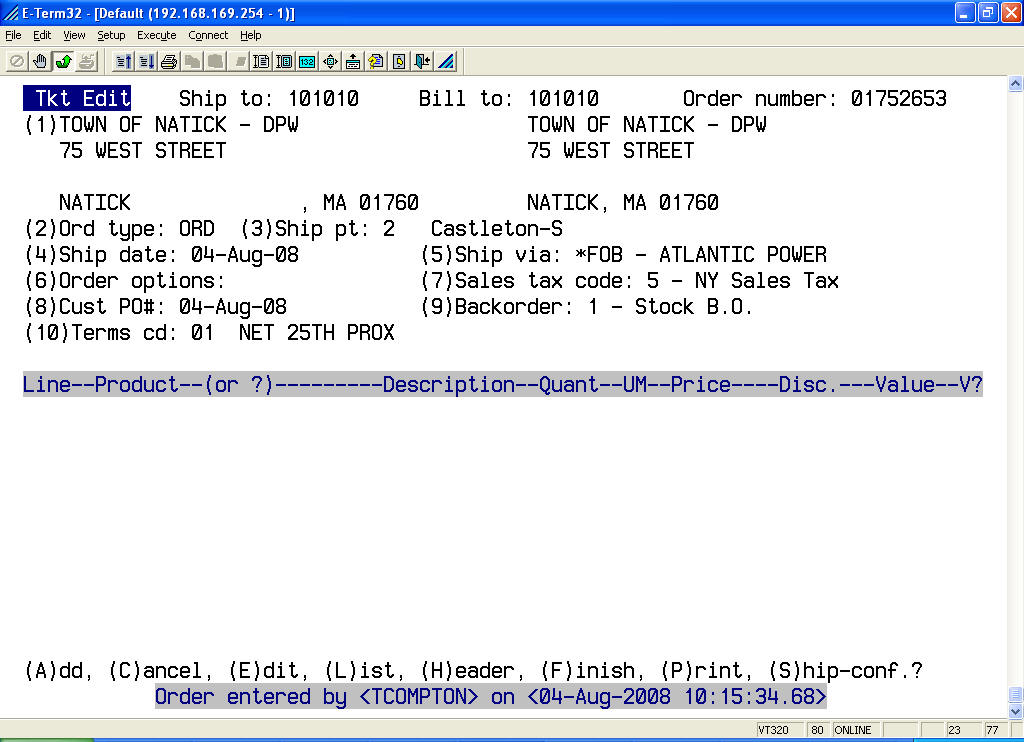
The cursor will appear in the bottom right corner of the screen, prompting the user to select any of the listed options (same as in order entry, except options P and X).
For example, type “A” <enter> to “add more items to the order.
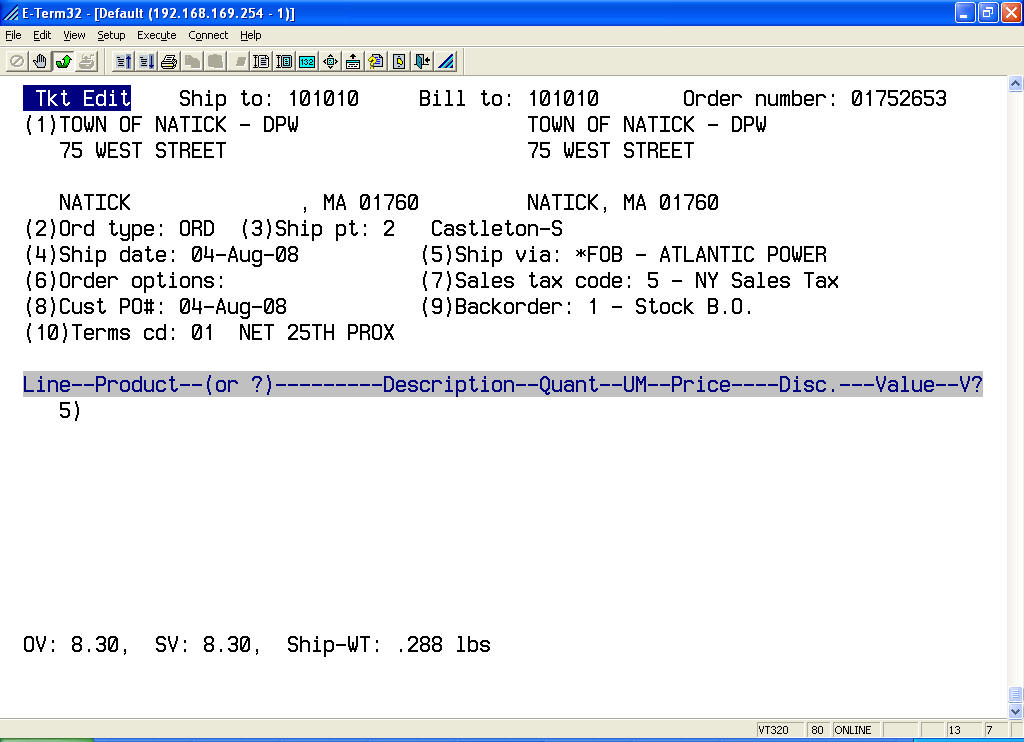
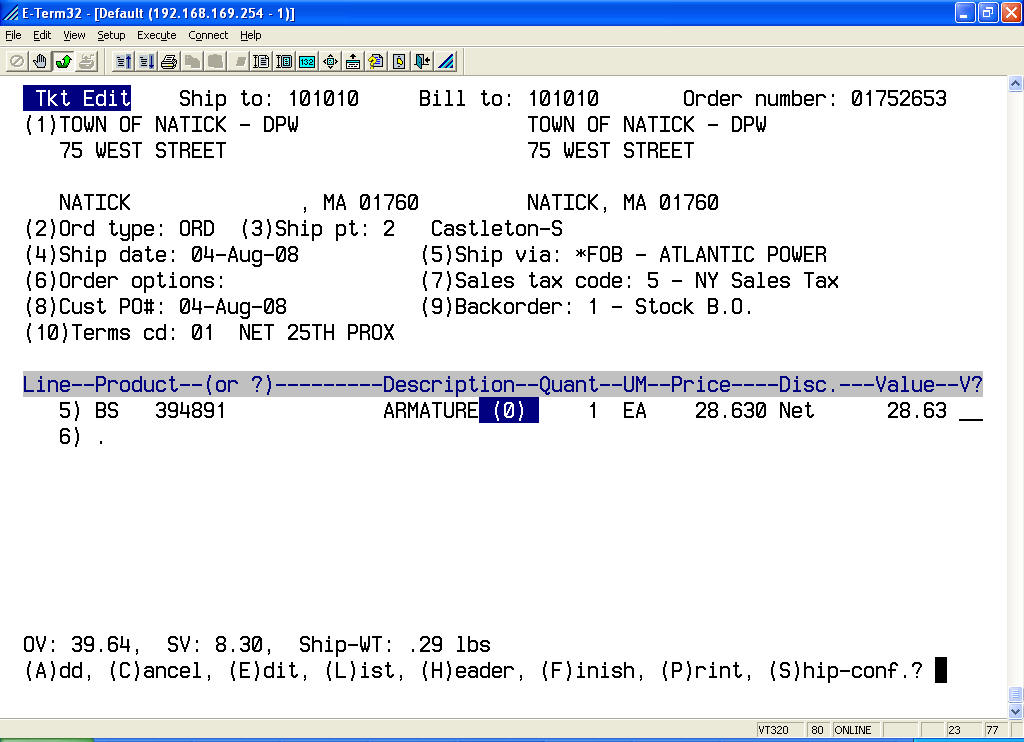
Once all editing is completed, finish the order by typing F <enter> at the appropriate prompt.
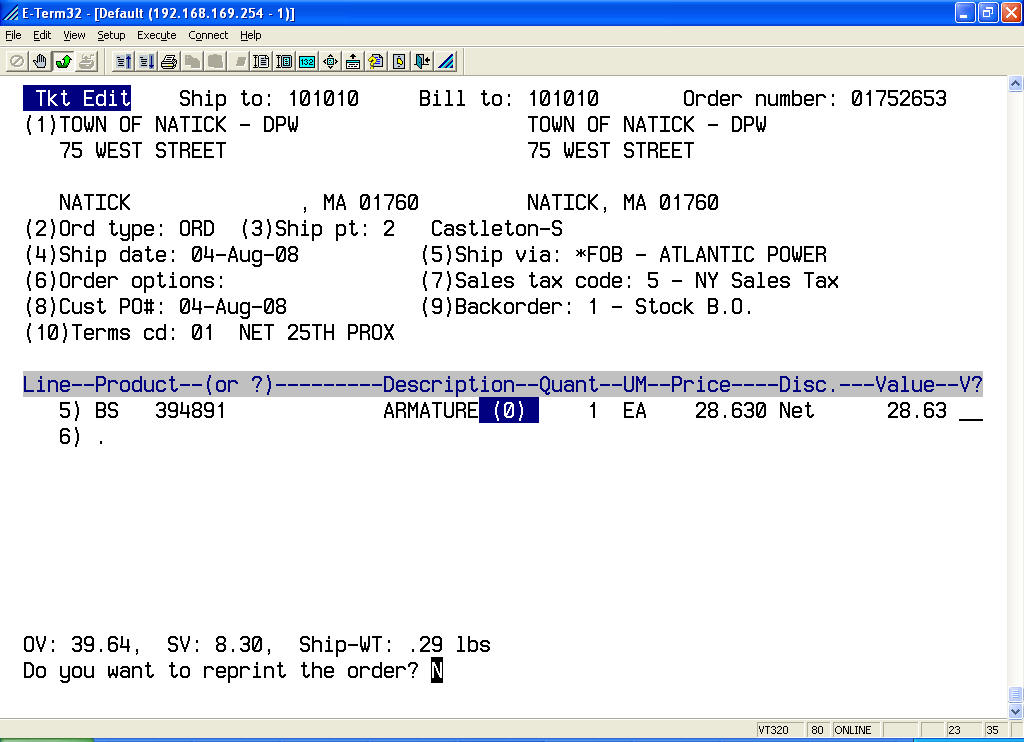
If you made changes, the program will ask if you want to reprint the order. It is recommended that you only reprint the order if you have the original in hand to avoid duplication.
Select Pick Ticket Exceptions / Invoicing (option # 3 from the main menu)
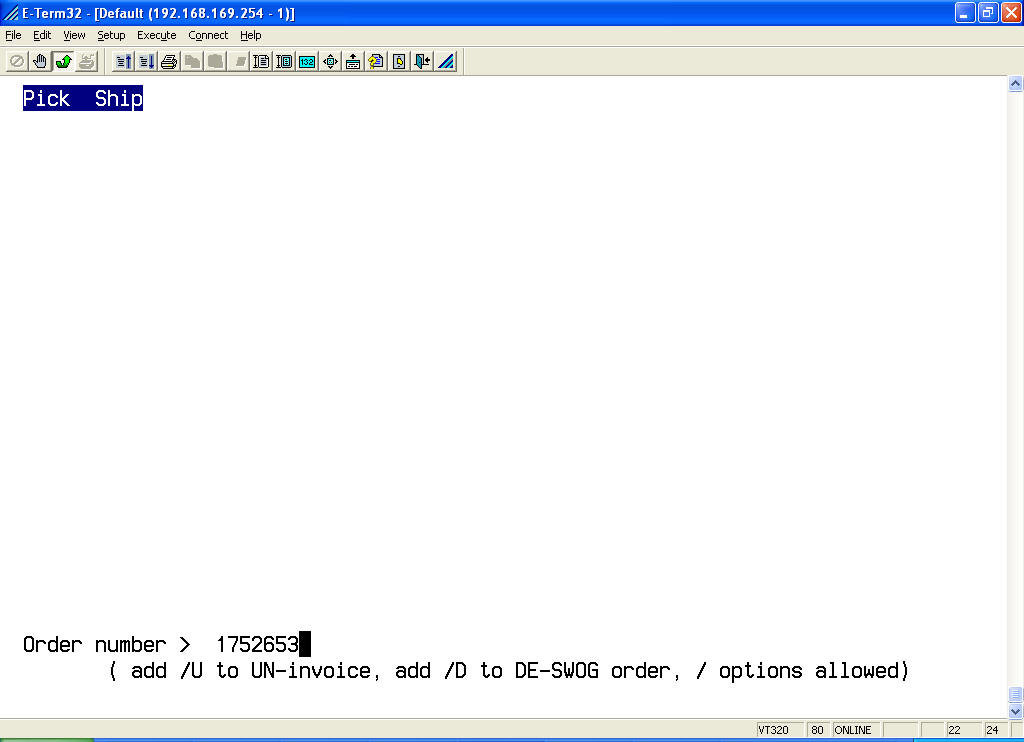
The cursor will appear in the bottom right corner of the screen, prompting the user to select any of the listed options.
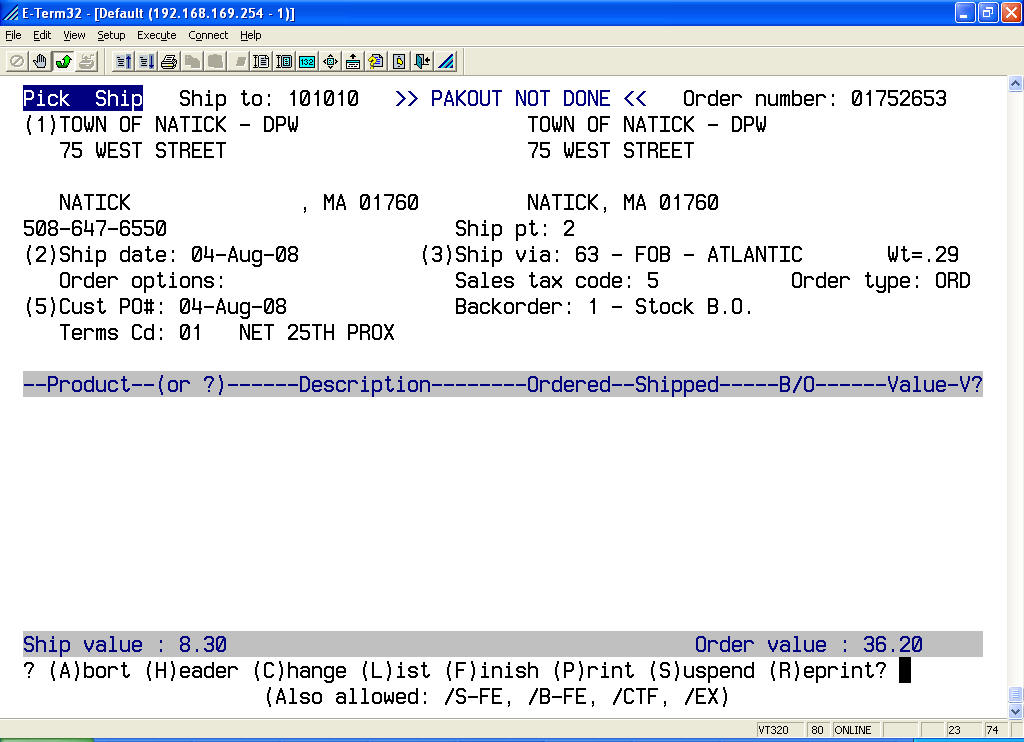
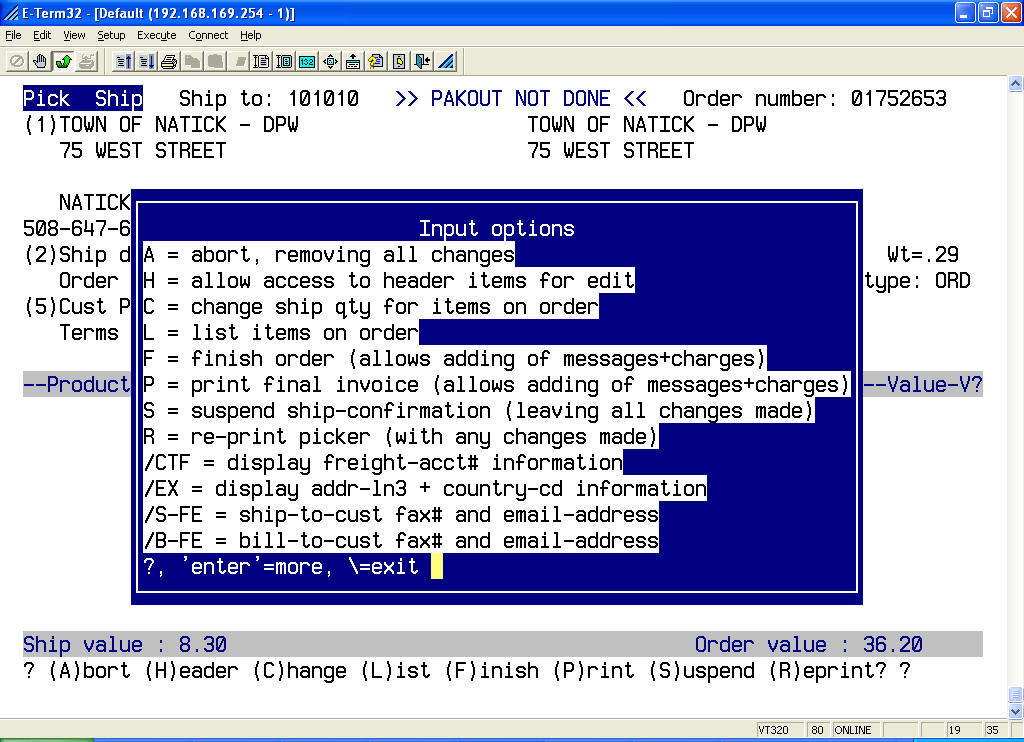
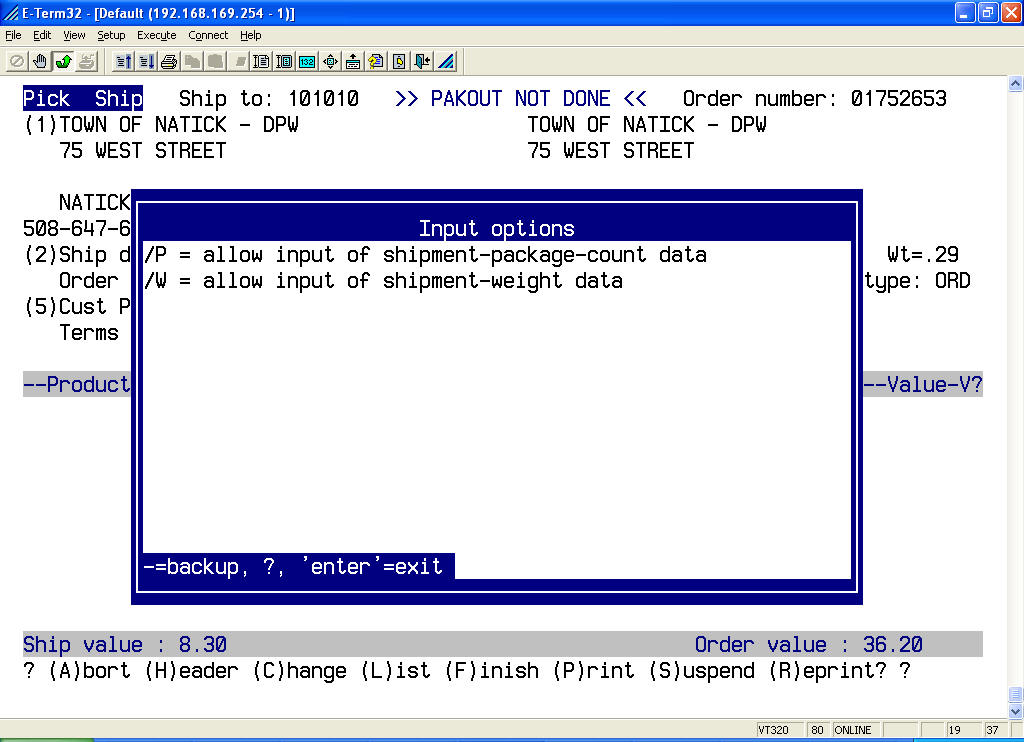
Type "F" <enter> to finish the ship-confirmation process as long as there are no changes necessary.
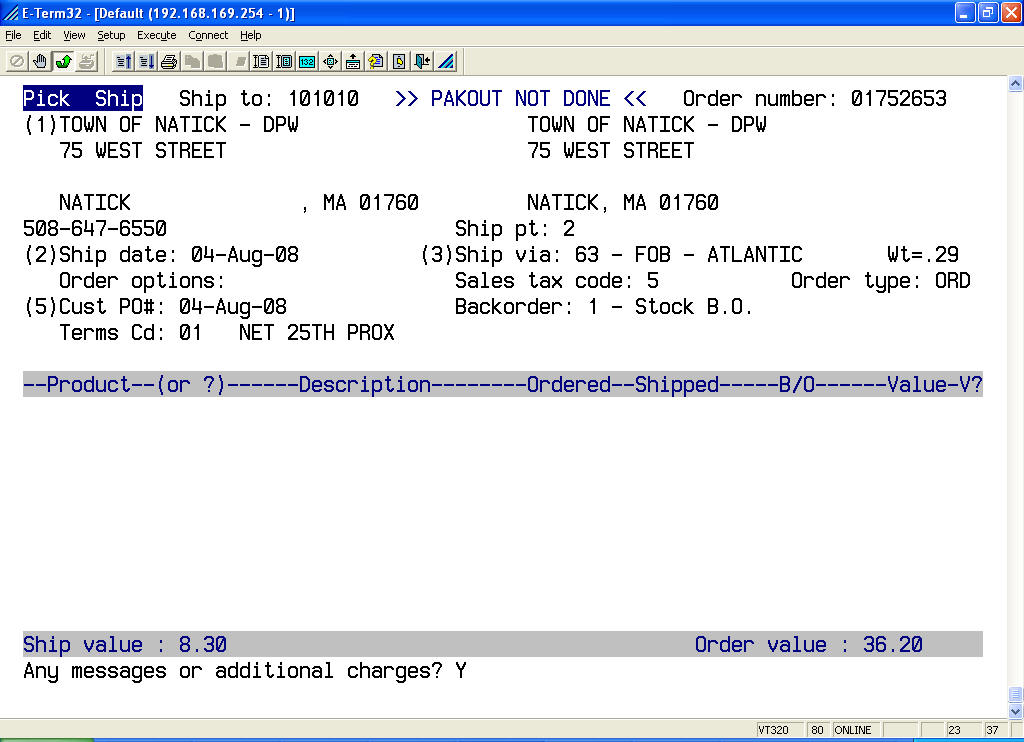
Type "Y" <enter> if you want to add messages lines an/or additional charges (outgoing freight).
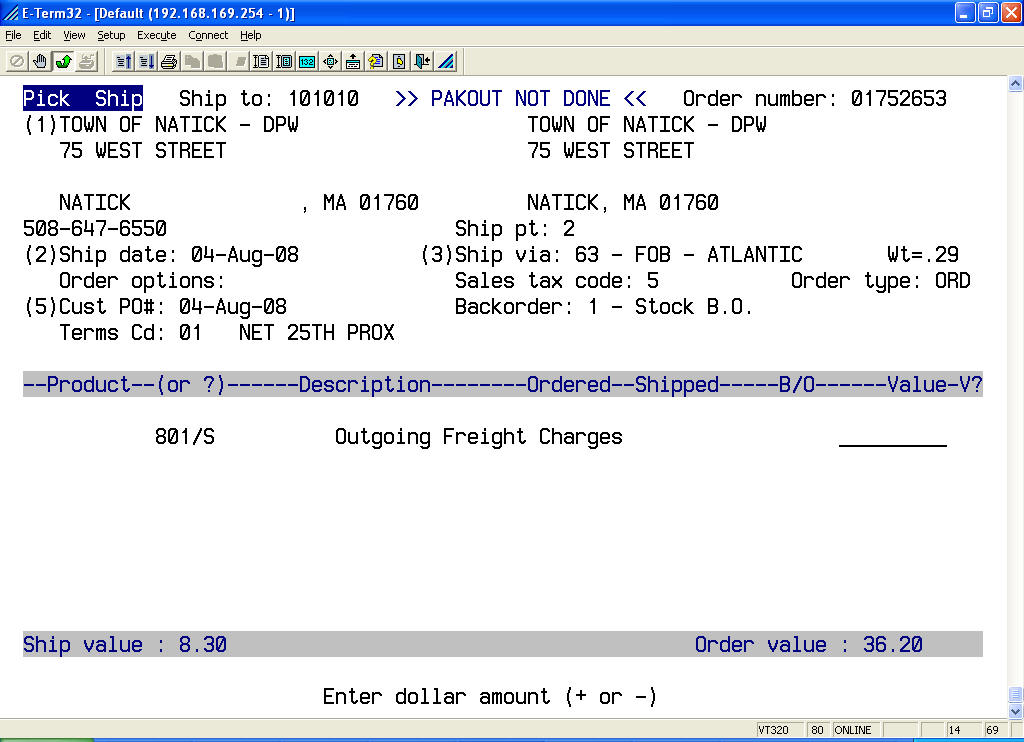
The system will display the default Outgoing Freight Charges code and prompt you to enter the amount to be charged. If you're not entering charges and want to enter a message then type "\" <enter> to remove the Outgoing Freight Charges code then you can enter you're message text of a different charge code.
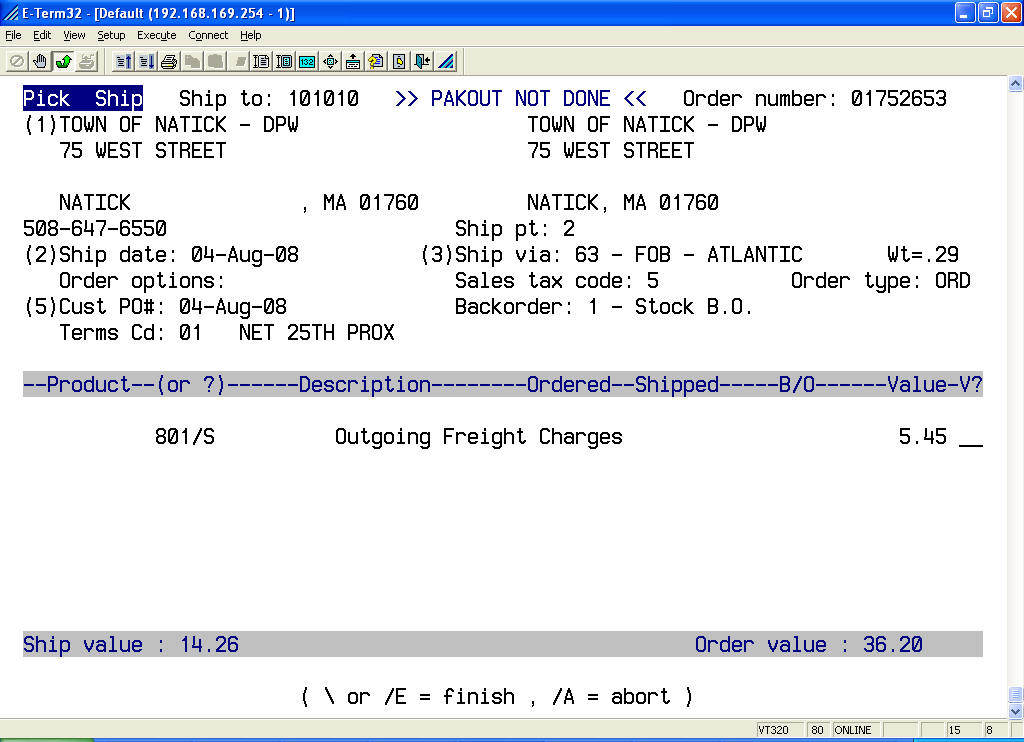
Type "\" <enter> when you completely finished with the ship-confirmation process.
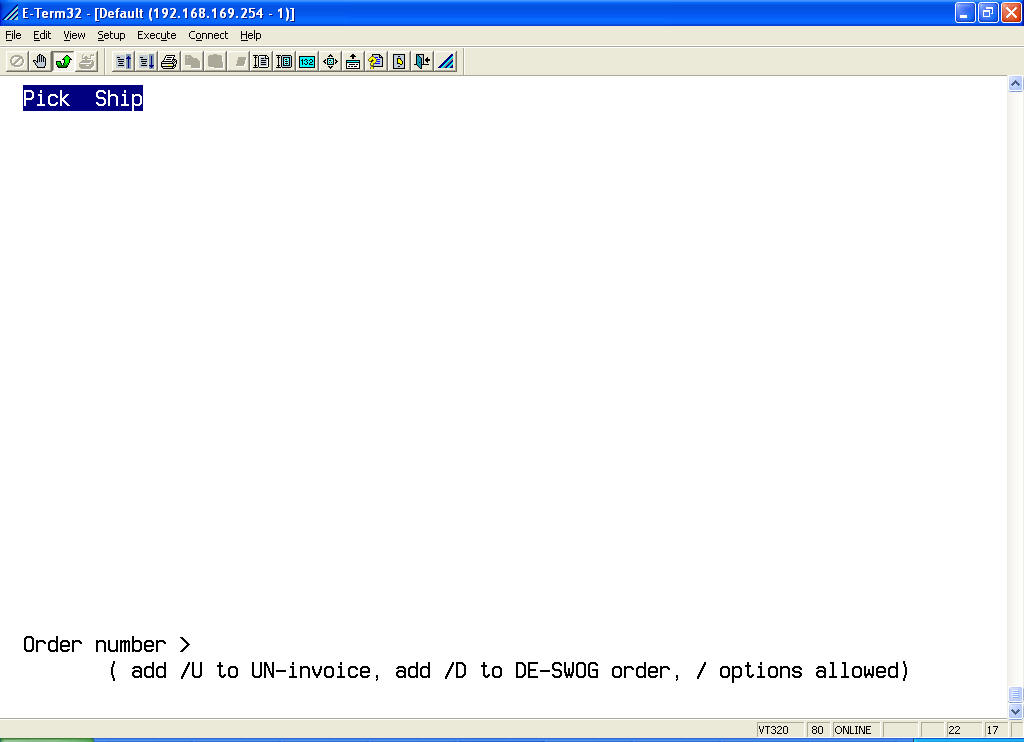
You'll return to the "order number" prompt to ship-confirm the next order.
Select Invoice Entry (option # 4 from the main menu)
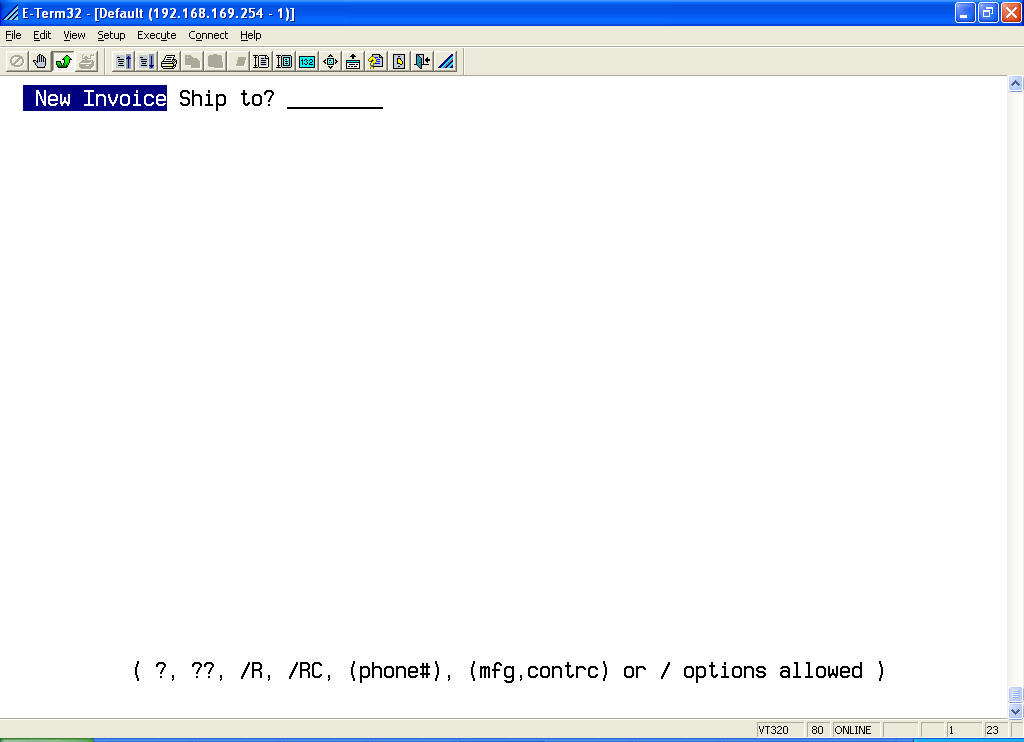
At the ship to? prompt, type (customer number)<enter>.
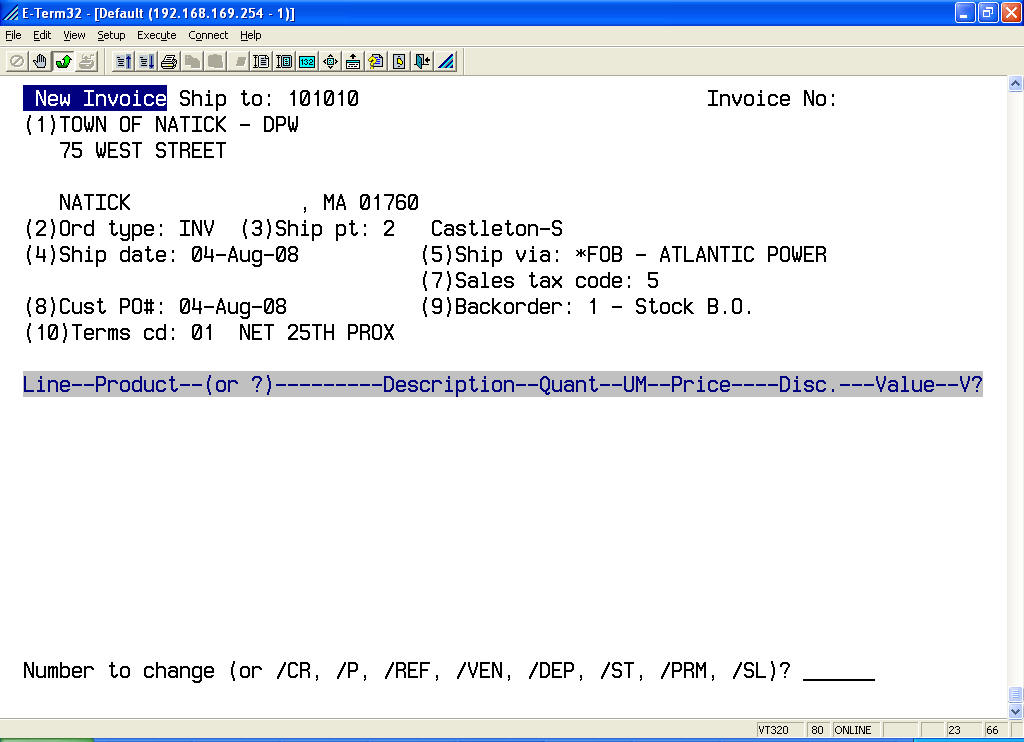
Change invoice header fields if necessary and enter your part numbers.
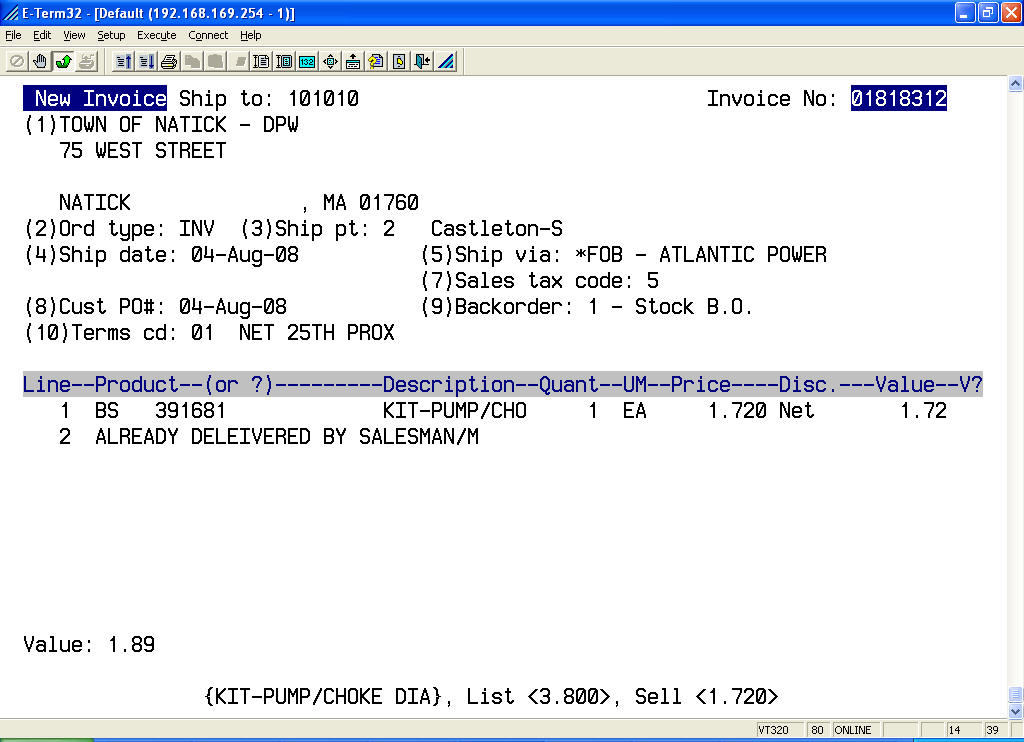
Enter any message text as needed.

Once all part numbers and message text is entered you can finish the direct invoice. The invoice will print/fax/email on the need batch invoice run. Type "P" <enter> to print the invoice now. You will be prompted for the printer name.
Here are some additional options you have at this prompt.
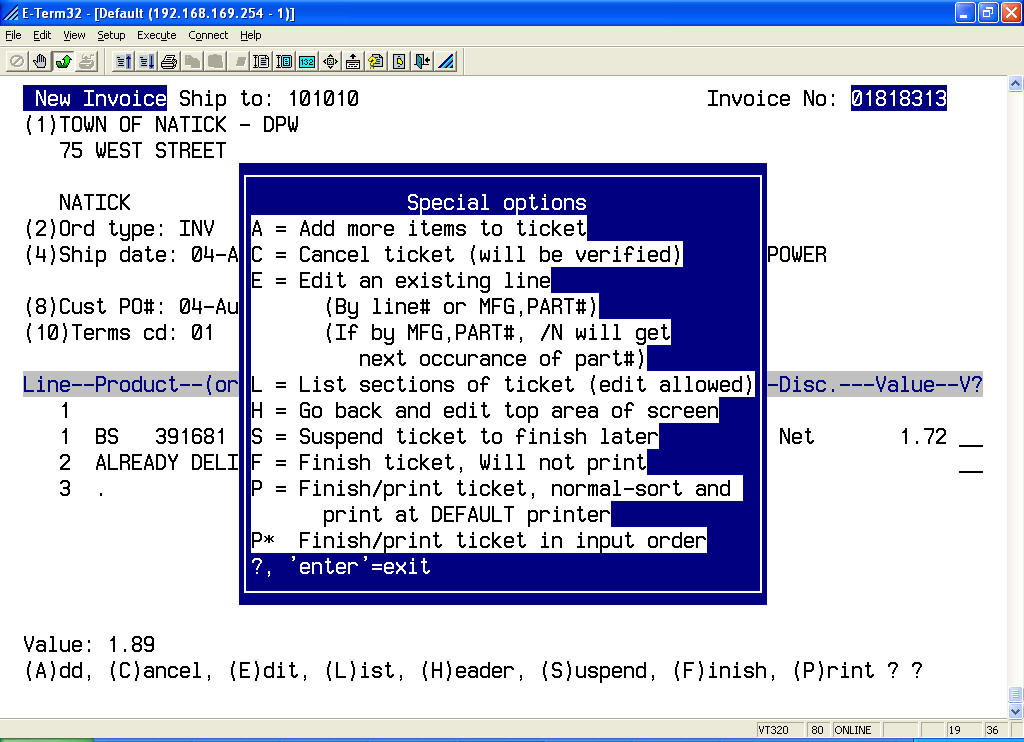
NOTE: No pick ticket is printed. You can invoice for an item regardless of on hand inventory.
Select Credit Memo Entry (option # 5 from the main menu)
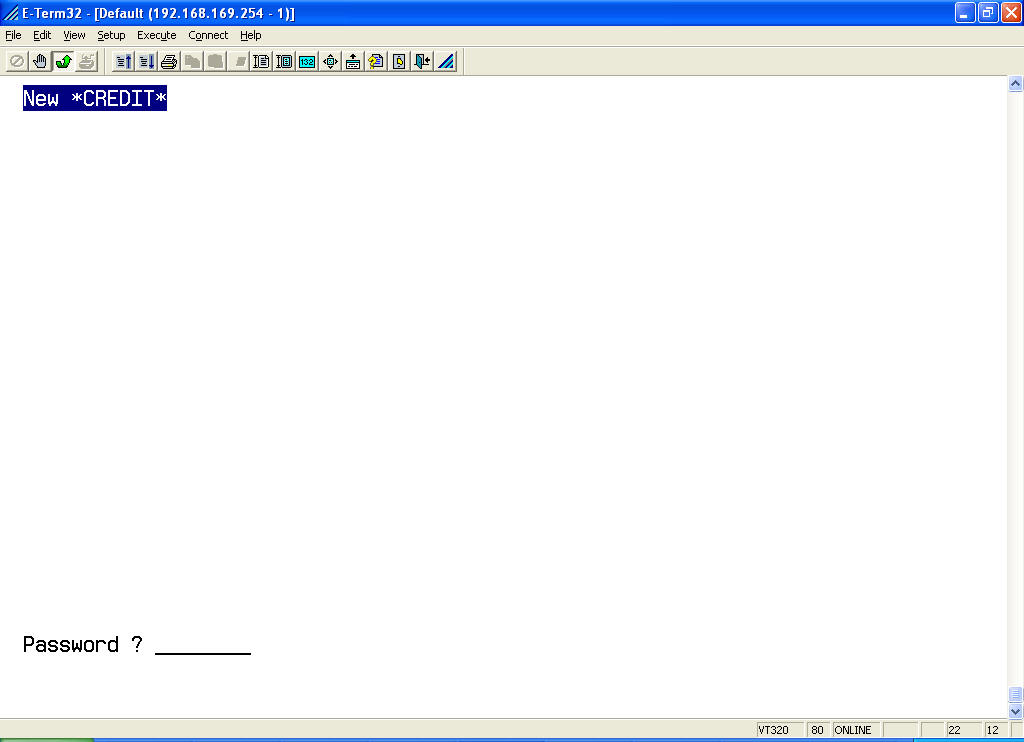
At the ship to? prompt, type (customer number)<enter>.
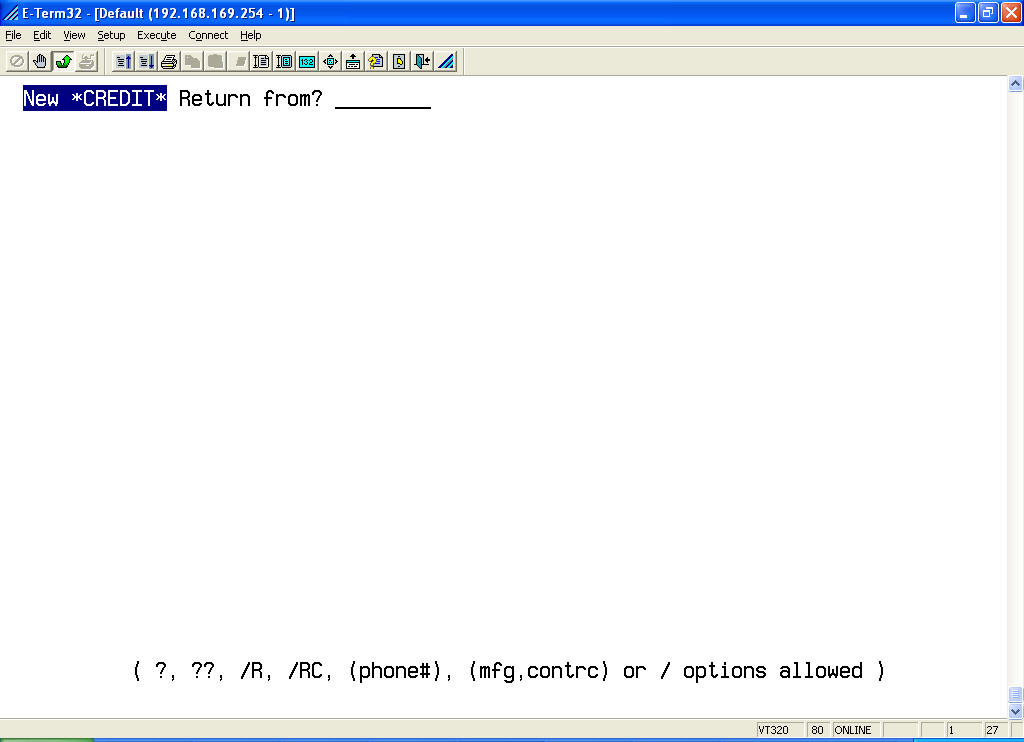
Since many credits are the result of merchandise returns, the program asks if you are “importing a RMA”.
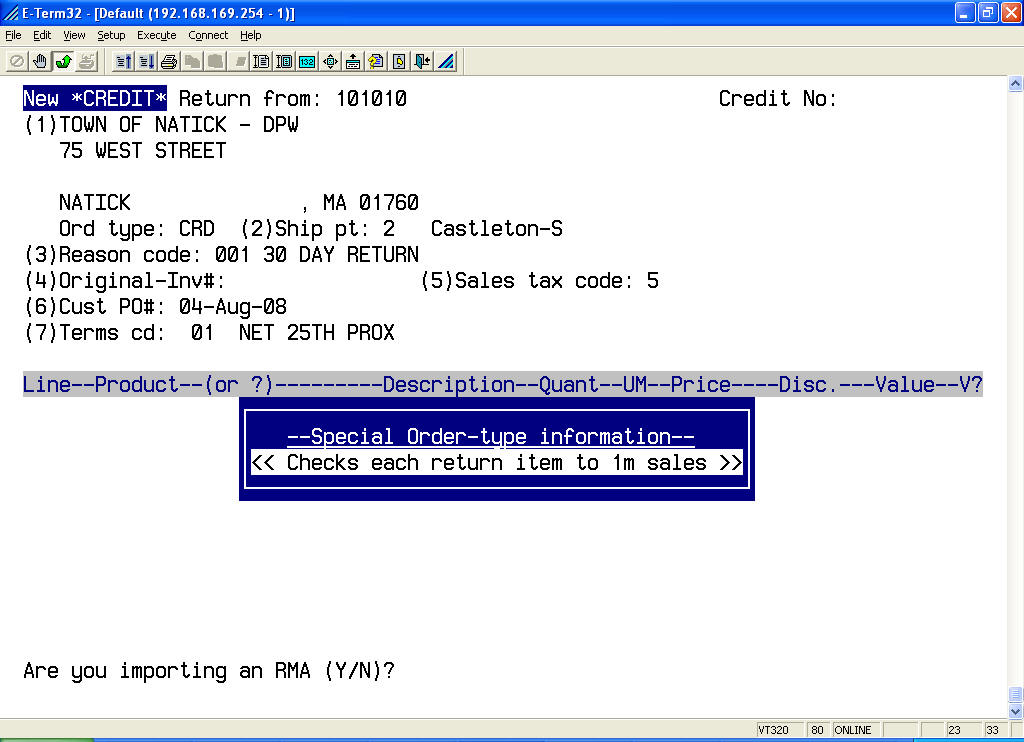
If you “importing” a RMA then answer “Y” to the prompt.

You can type "?" <enter> if you don't know the RMA number and then select from the popup box.
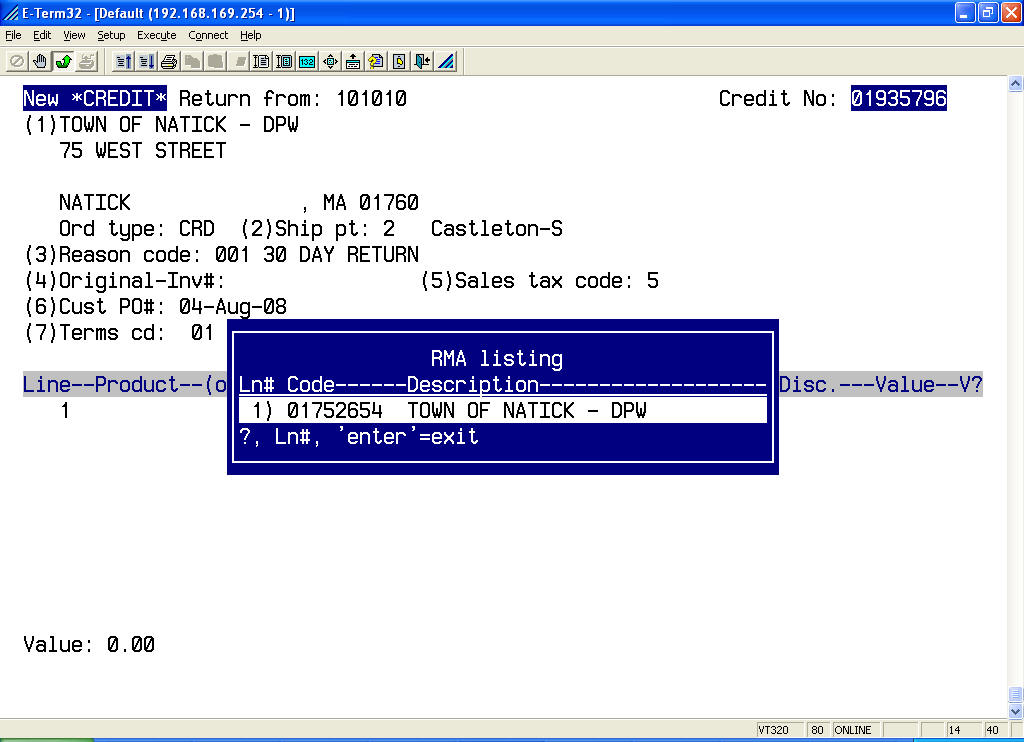
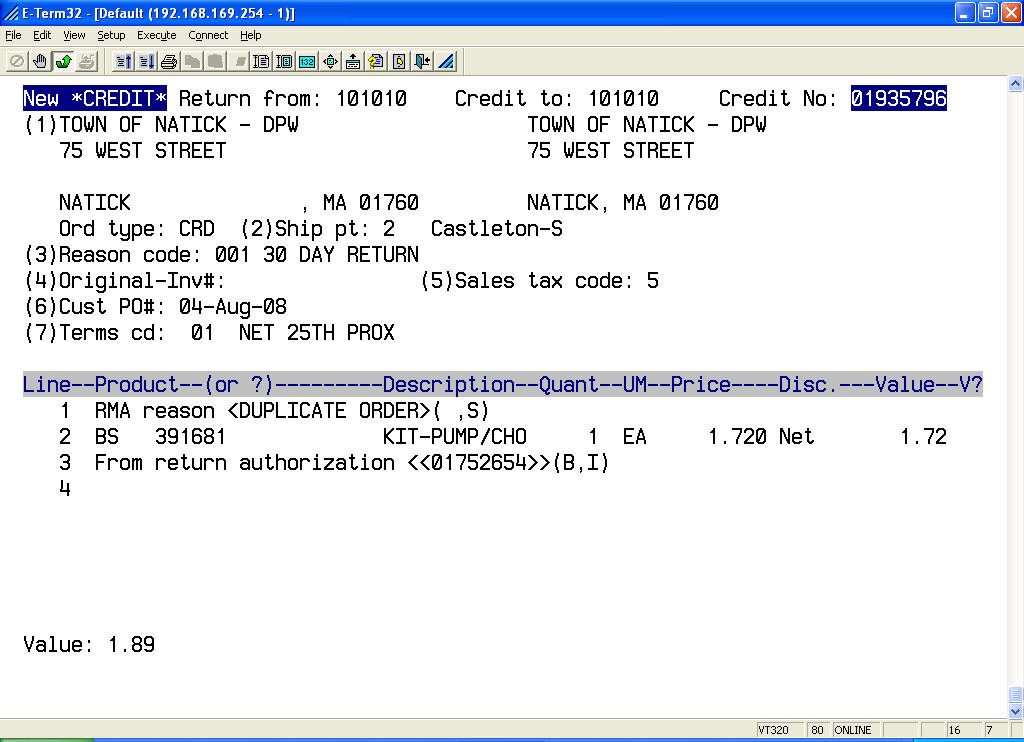
The program imports the original detail from the previously entered RMA. Edit the detail as needed then finish the credit. The credit will print/fax/email on the need batch invoice run. Type "P" <enter> to print the credit now. You will be prompted for the printer name.
If you’re NOT importing a RMA, then answer “N” to the “Are you importing an RMA (Y/N)?” prompt. Your cursor stops at the “reason code (credit header field #3) for validation. Select the appropriate reason code and proceed.
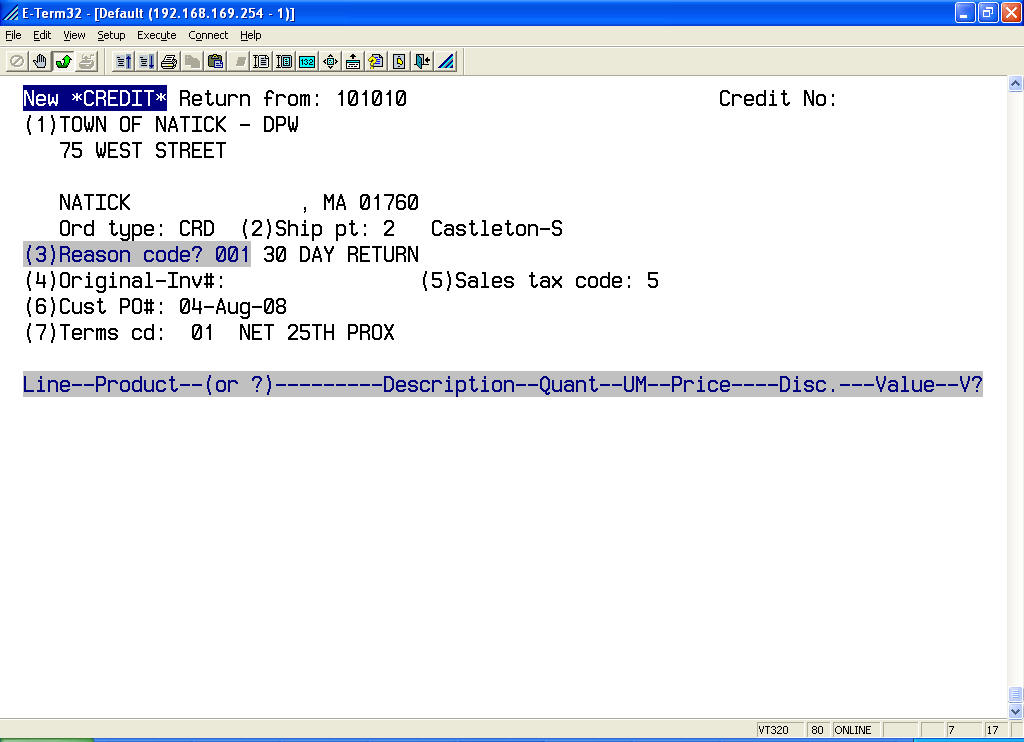
Note: Field #3, Reason Codes are based on your company’s practices. In general, the reason code used determines how the credit affects inventory, movement, sales, cost of sales, and the price used. Additionally, reason codes can be setup to check for the last time a customer purchased the item and issue credit based on the findings. Some examples follow but the actual code may be different for your company.
· 001 30 DAY RETURN
Default for regular returns/credits
· 040 CUST STOCK RETURN AT OLD PRICE
Used when you want to credit at old prices
· 041 CUST STOCK RETURN OLD, NO AFFECT TO ON HAND
Used when you are crediting at old price and not putting in stock
· DEF DEFECTIVE MERCHANDISE
Used for crediting defective merchandise and does not affect inventory
· VR1 VENDOR RETURN – OLD PRICES
Used to return merchandise to vendors at old prices
· VR2 VENDOR RETURN – CURRENT PRICES
Used to return merchandise to vendors at current prices
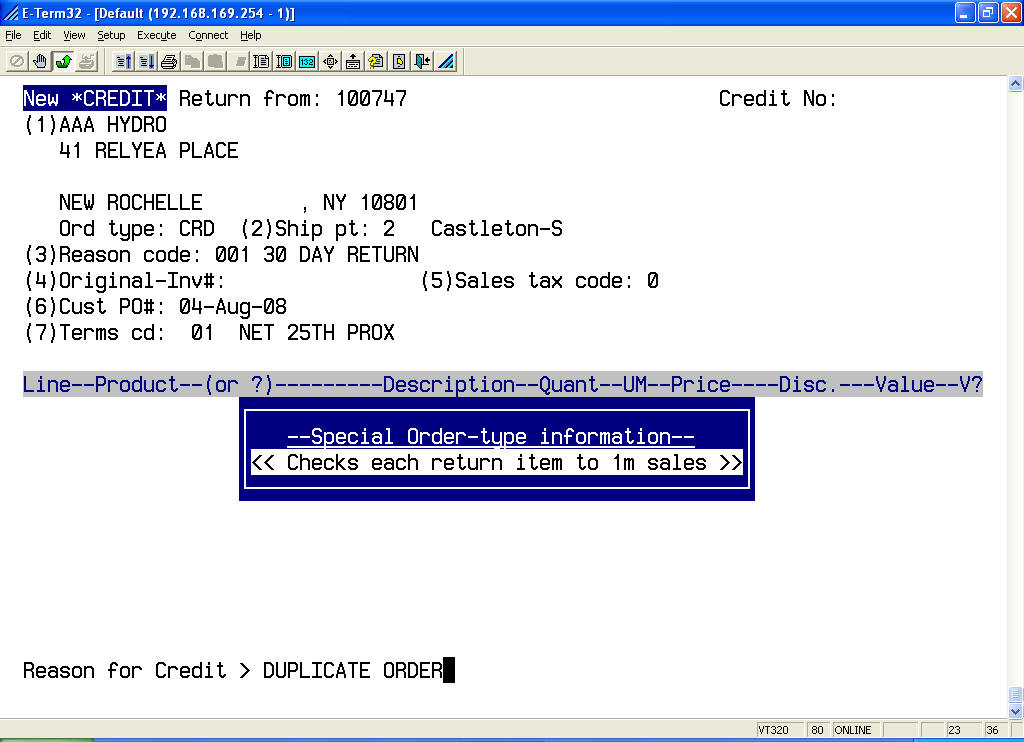
Enter the “reason” for the credit and press <enter>.
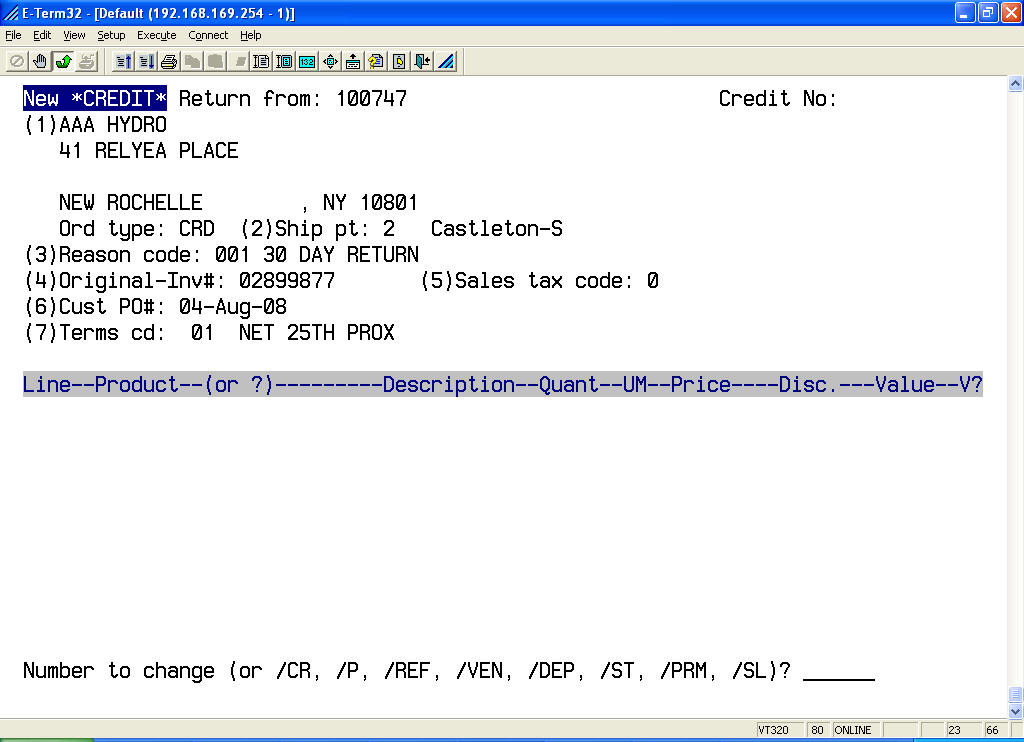
Change credit header fields as necessary.
Field # 4 Type the original invoice number relating to the credit memo. The program verifies the invoice belongs to the appropriate customer.
Enter the parts being credited or the DC (debit/credit) code if you are crediting for shipping charges, school fees, yellow pages, etc.
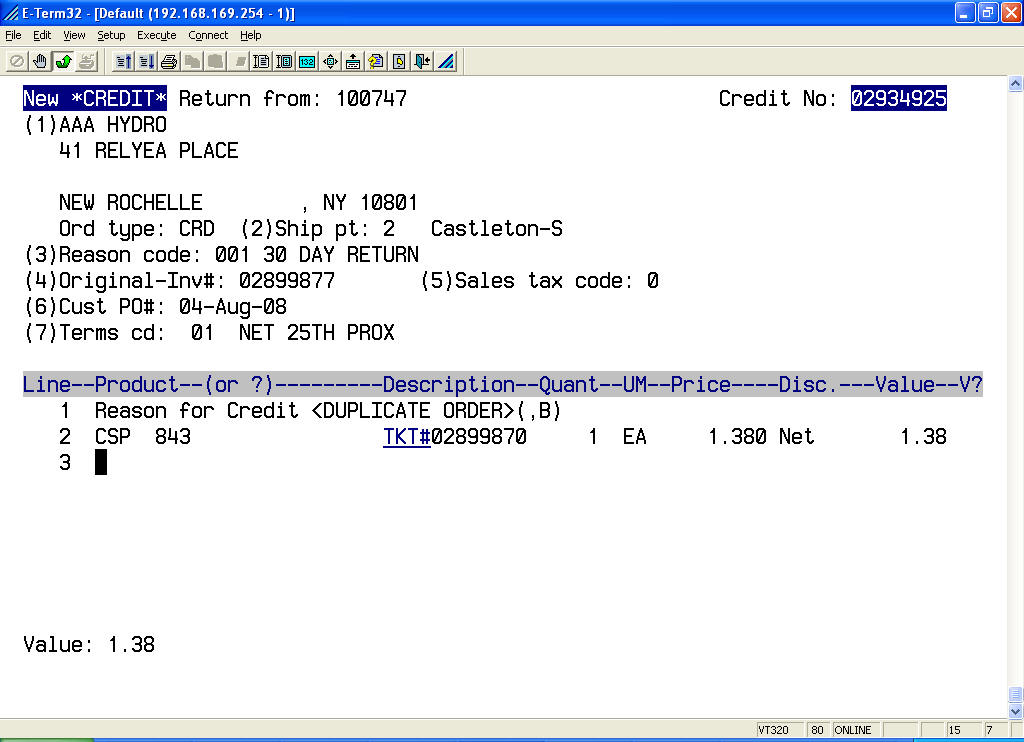
Note: Enter a text message in the line area to document a detailed reason for the credit memo. Codis will automatically print the invoice number if the reason code being used is setup accordingly.
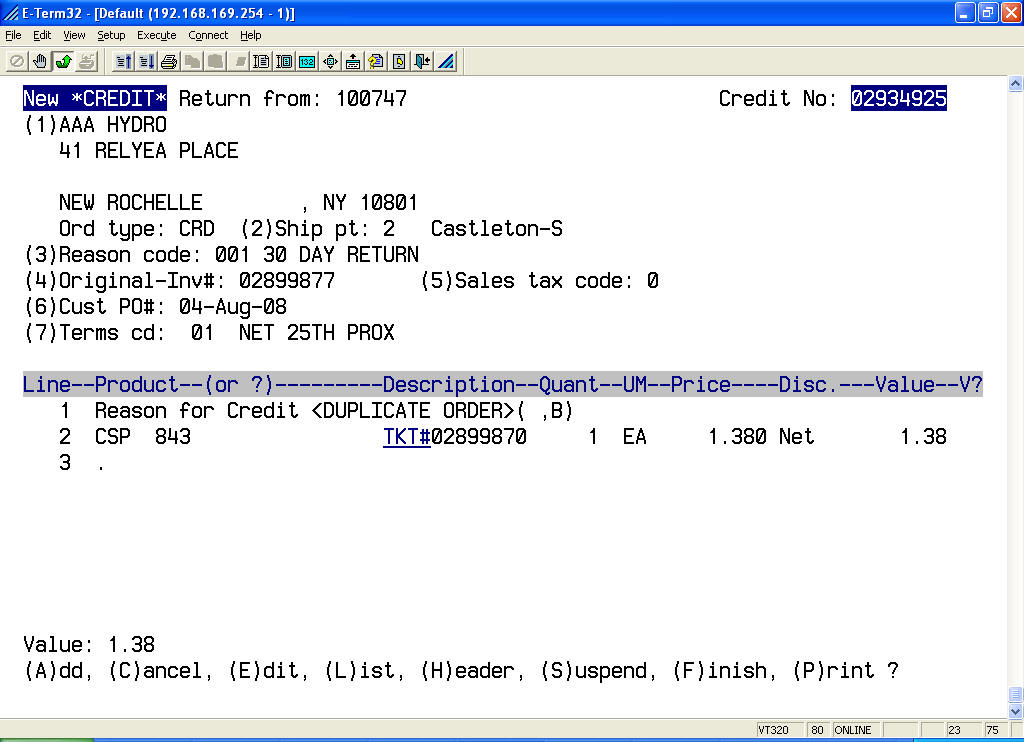
Edit the detail as needed then finish the credit.
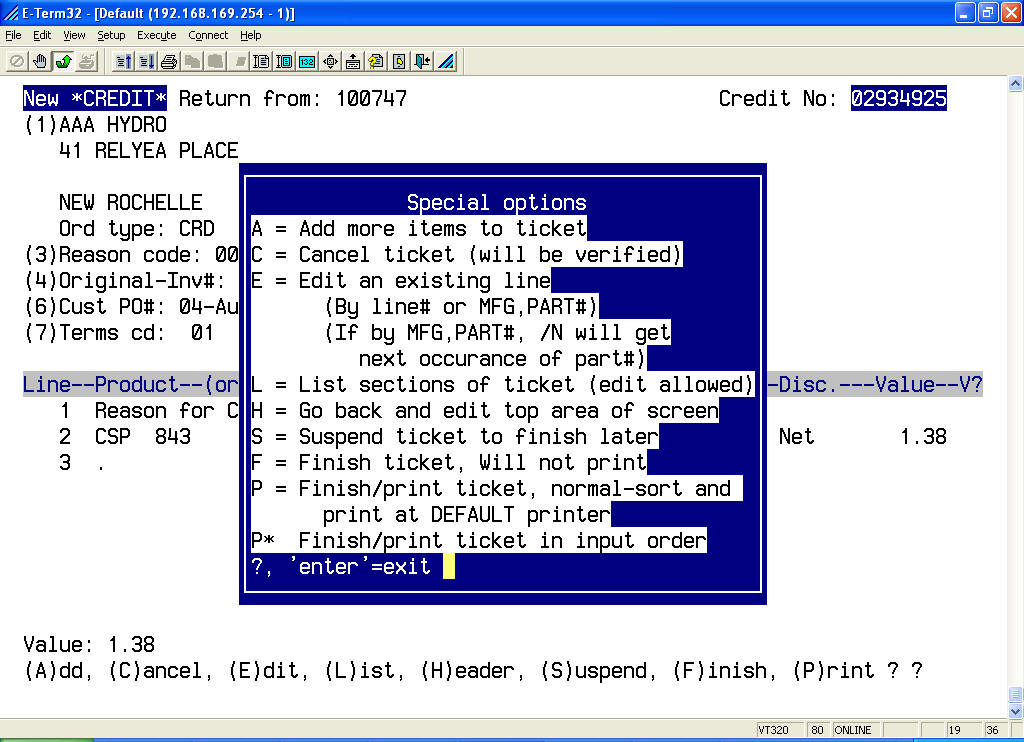
Edit the detail as needed then finish the credit. The credit will print/fax/email on the need batch invoice run. Type "P" <enter> to print the credit now. You will be prompted for the printer name.
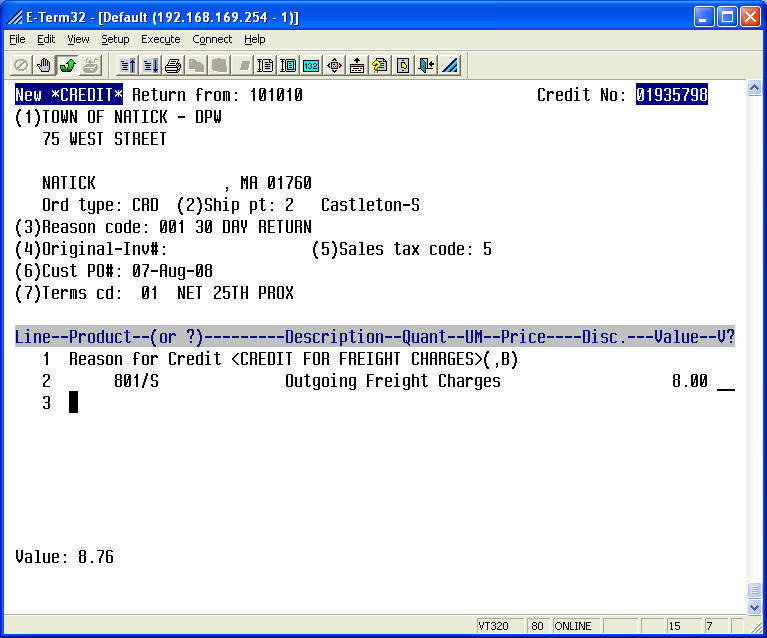
Here’s an example of crediting a shipping charge using a DC code.
Select Backorder Entry (option # 6 from the main menu)
Type (customer number)<enter>.
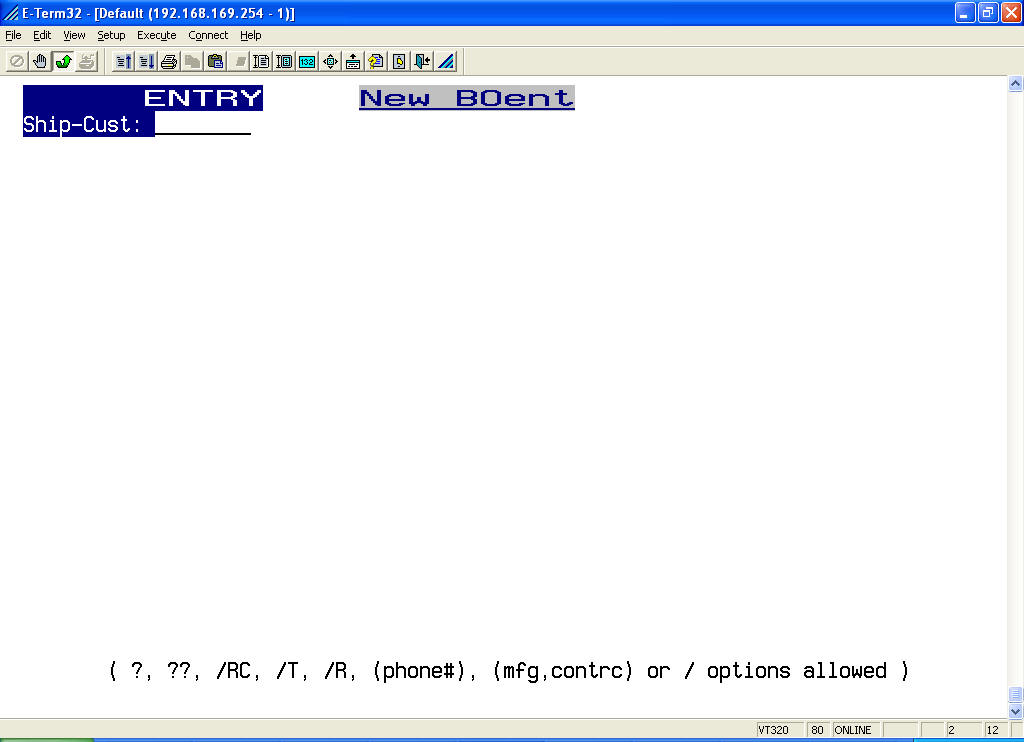
Change header fields if necessary, ( i.e. ship via:UPS NEXT DAY AIR and backorder: 4-EMGCY to CUST) or press <enter> to begin entering part numbers.
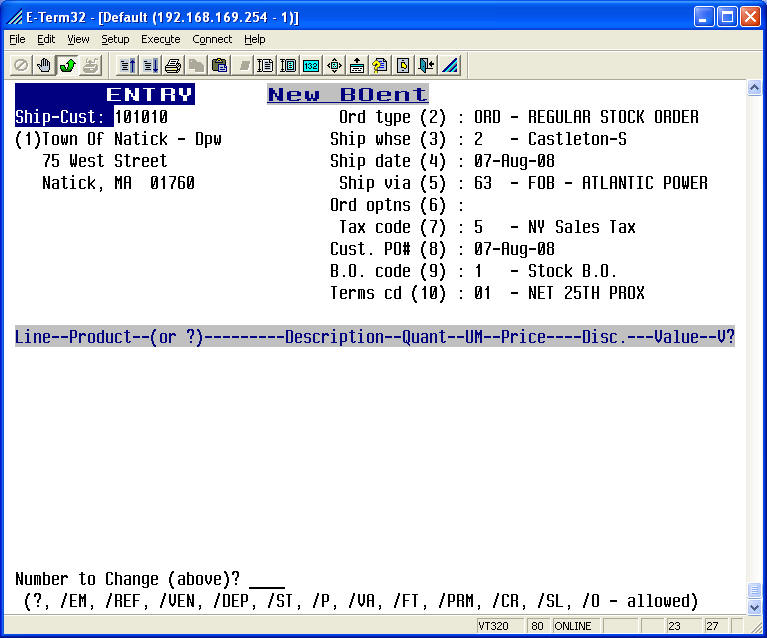
Enter part numbers and quantities just as you would in Order Entry.
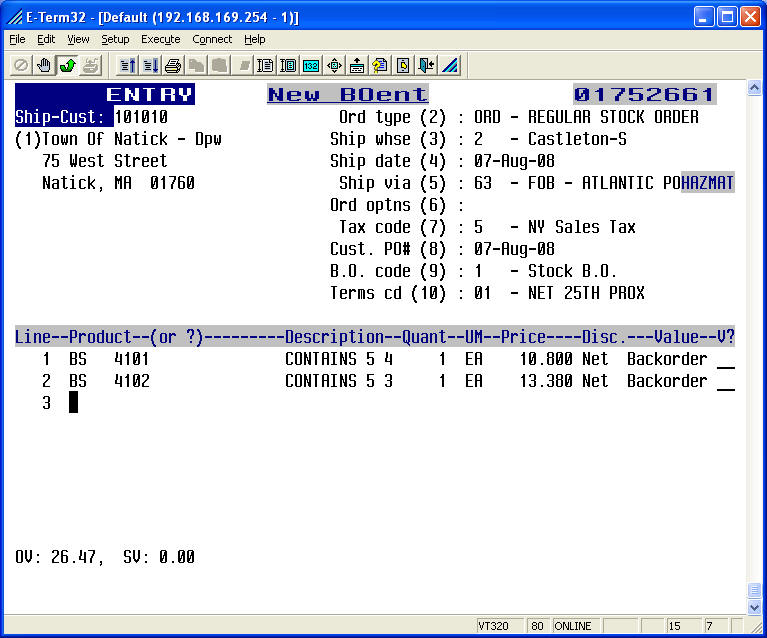
To finish the order type F <enter>. Typically, Backorder Entry is used when you want to force something to backorder even though it is in stock or have previous knowledge that the item is out of stock. Regular Order Entry will automatically switch to Backorder Entry if nothing on the order is shippable and no pick ticket will be created.
RESTARTING A SUSPENDED OR PENDING ORDER
Select Restart Suspended / Pending Orders (option # 7 from the main menu)
At the order number > prompt, type the order number or:
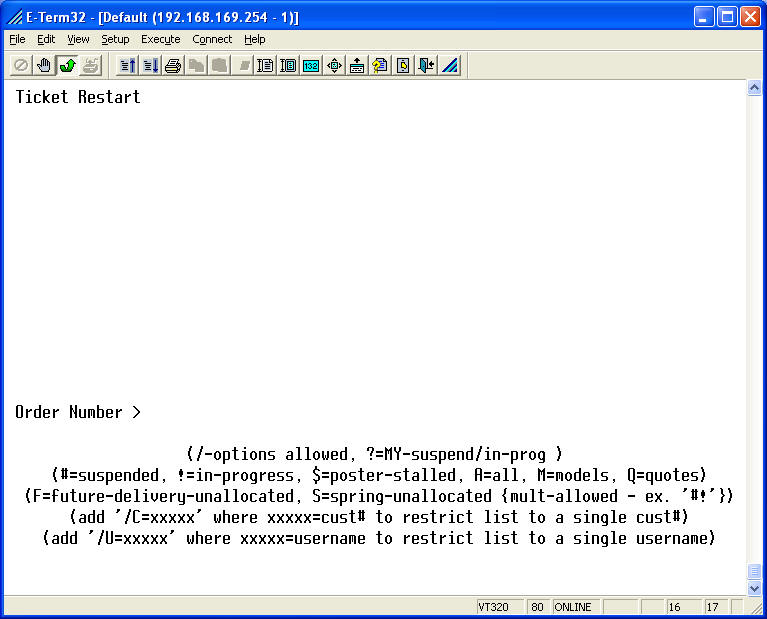
Type a “?” <enter> to list ONLY you’re suspended/in-progress orders.
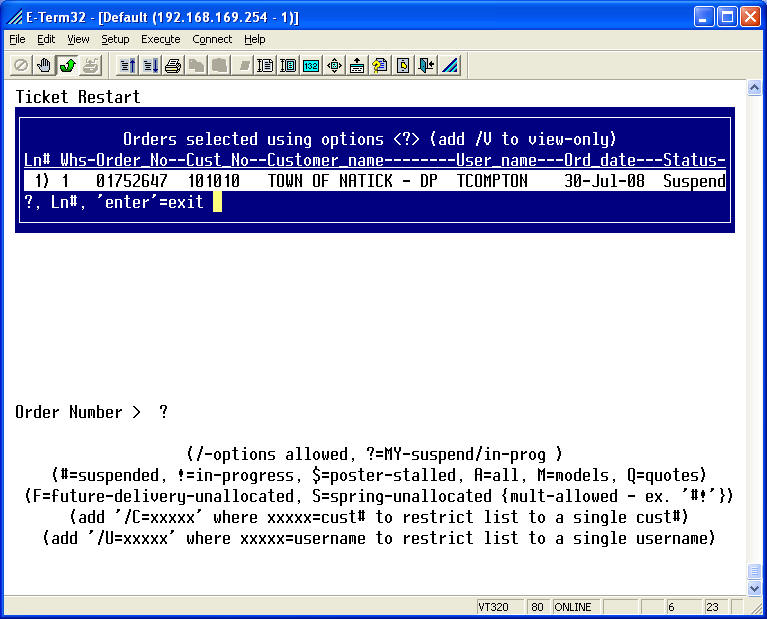
Type “#” <enter> to list ALL user’s suspended orders.
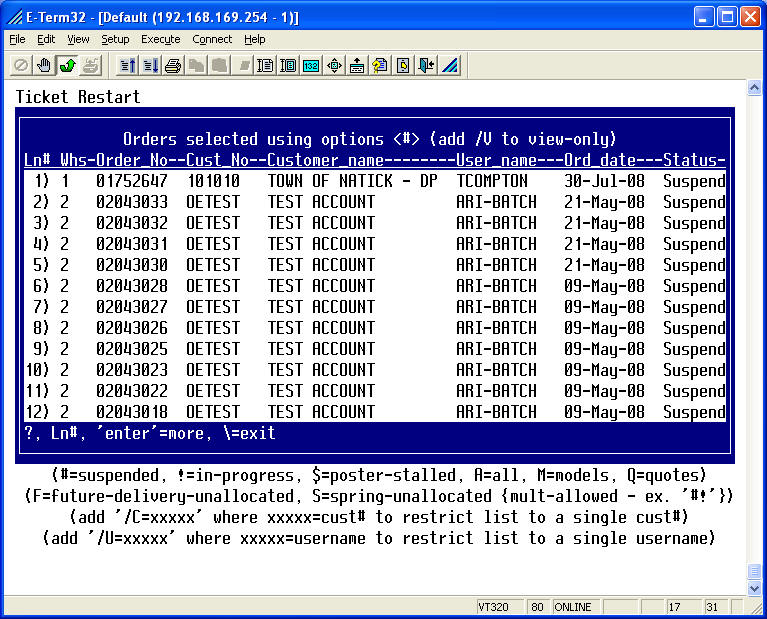
Once you select the order you want to restart, the cursor will return to the next line following the last part number on the order.
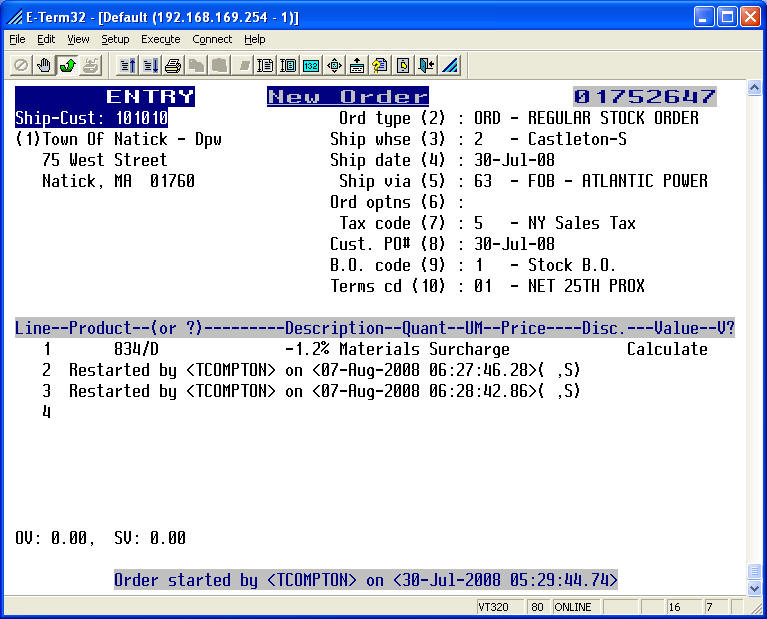
This menu option is used to return to a:
· Suspended Order
· Future Order
· Quote Order
· Returns (RMA)
Note: Restarts of any suspended order can also be done in Order Inquiry/Reprint (option # 11) using the (L)ist option. Restarts of your suspended orders can be done in Order Entry (option #1) using the “/R” option at the ship-to prompt.
EDITING / INQUIRING ON A BACKORDER
Select Backorder Edit / Inquiry (option # 8 from the main menu). You can edit/inquire by invoice, customer, or part number. Adding “/A” to your selection will show ONLY “allocated” backorders (example: C/A). Adding “/B” to your selection will show ONLY backorders from BO Entry (example: C/B).
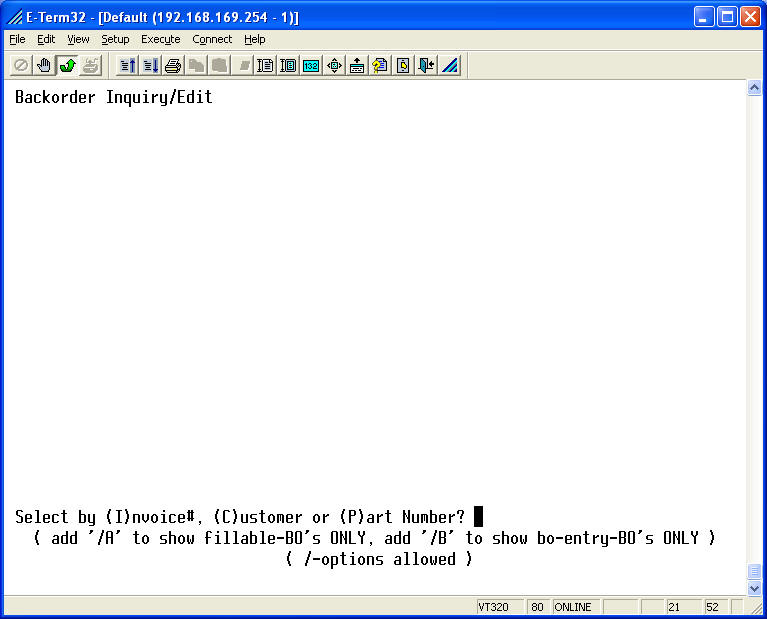
If you want backorders by customer, type C<enter>.
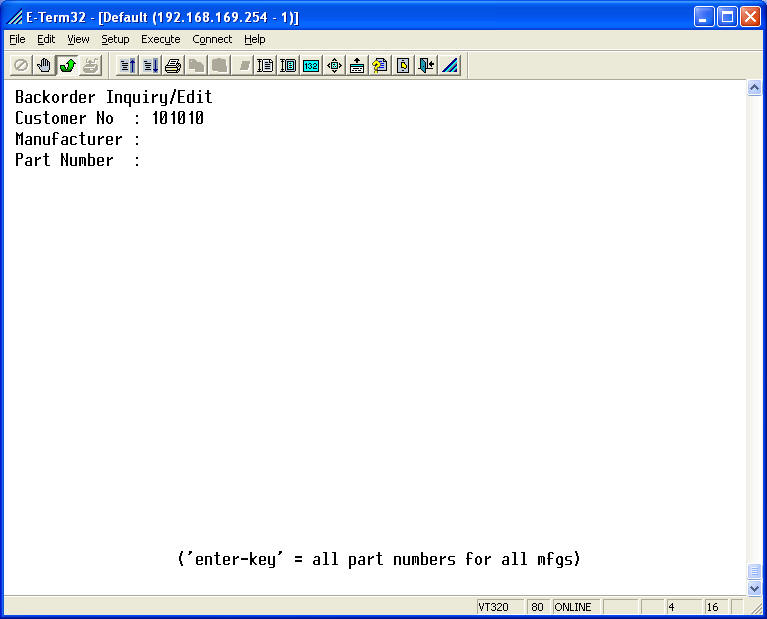
Type the manufacturer code you want to display (leave it blank if you want all manufacturers).
Type the part number you want to display (leave it blank if you want all part numbers).
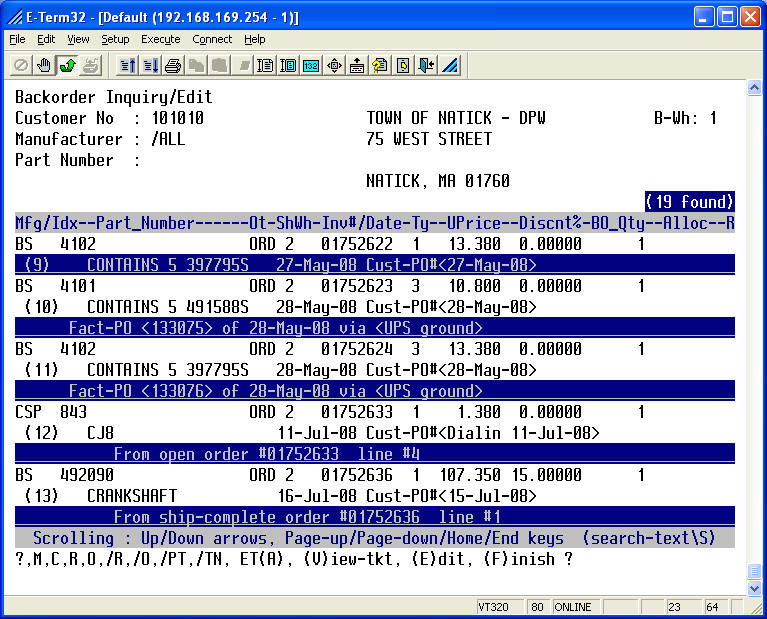
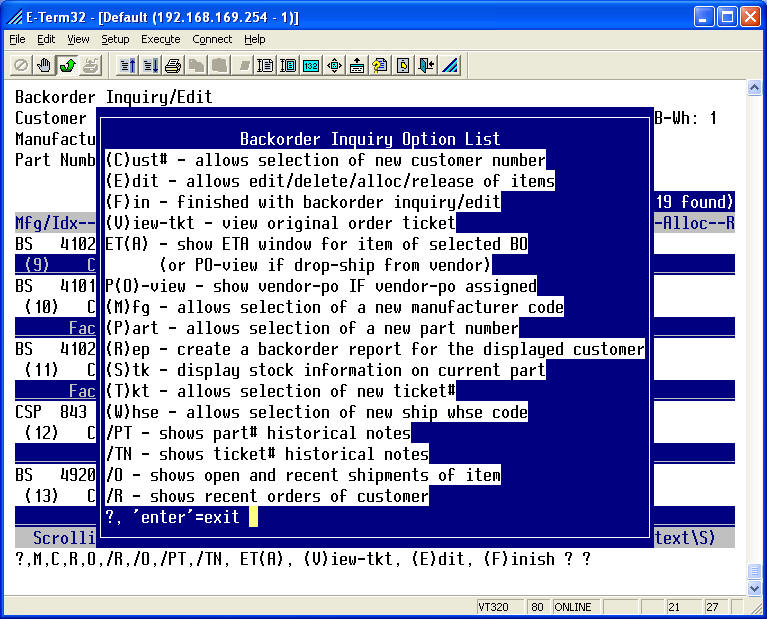
Once the backorders are displayed you have numerous options as indicated in the following screenshot.
When entering (E)dit mode, your cursor is positioned at the “BO_Qty” prompt of the first part number in the “scrolling” window. A new set of options are then available as indicated by the “strip” menu at the bottom of the screen.
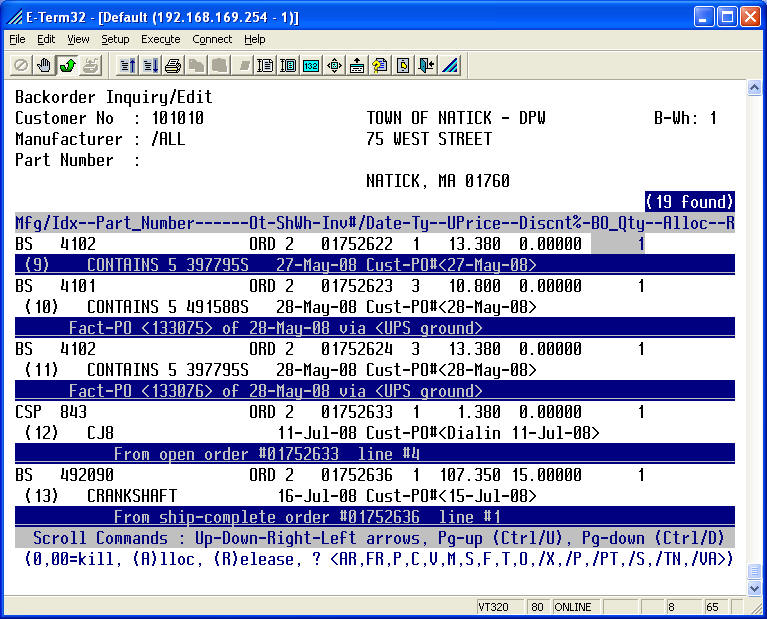
Since backorders are displayed in a scrolling window and if you don’t see the specific backordered item on the screen, you can scroll up/down a line at a time or scroll up/down a page at a time by using the arrow keys or page-up/page-down keys. The cursor will begin at the BO Qty field of the first part number in the scrolling window. If this is the correct part number then use the arrow keys to move to the field you want to edit or you can also use the down arrow key to move to correct part number in the scrolling window.
When editing a backorder, you can move from left to right with your left and right arrow keys as well. For instance, editing the backorder type of the first backorder in the example above would require you to move the cursor from the BO_Qty field to the Ty field by pressing your left arrow three times. Then you would type the new backorder type and press <enter> to affect the change.

In addition to changing the backorder type, you can change the ship-via code of the backorder by using the “/S’ option here. “/VA” allows you to source the backorder from an “alternate vendor” such as an IC-COM partner (inter-CODIS communication – other CODIS distributors).

A third information line will appear in the scrolling window for each item displaying additional info such as direct ship and open order status when applicable as indicated by the two backorders at the bottom of the scrolling window.
If you’re inquiring by part number the screen will look like this:

The options available are a little different than when inquiring by part number but the functionality is the same.
If you’re inquiring by invoice the screen will look like this:

The options available are a little different than when inquiring by invoice but the functionality is the same.
Select A/R Inquiry (option # 9 from the main menu)

You are now prompted for:
· (C)ustomer number
· (I)tem or invoice/credit number
· (E)xit to leave the inquiry

After entering the customer number, you are prompted for the A/R category.

Default is /ALL. This will show all A/R. Category “01” displays regular terms items and category “02” displays dating items.
You may display detail or summary information. Furthermore, you may select a date range, original amount, or reference (purchase order number) to limit your display. You may field exit (<enter>) through these prompts if you don’t want to limit your display.
This is an example of a customer’s category “01” (regular terms) items.

This is an example of a customer’s category “02” (dating terms) items.

Viewing a specific A/R item can be done by typing the line number associated with the item and a “/V” (example: 1/V would display invoice 01082127.
Select Product / Stock / Inquiry (option # 10 from the main menu)
To inquire on an item, type the part number and press <enter>.
Two types are screens are available in Product / Stock Inquiry. The “short” screen shows a minimum amount of information. Here an example:


/A = Display Allocated and open order items

/B = Display Backordered items

/H = Display Sales History by Warehouse Code and Month

/HR = Display Receipt History by Warehouse Code and Month

/HI = Display Invtxn/PO History by Warehouse Code and Month


/L = Display Lost-Sales History by Warehouse Code and Month

/M = Display more Stock File information


/MI = Model Inquiry


/MM = Display Stock Movement for multiple whses

/MO = List of Missing On-Hand Items

/N = Display annotations for displayed part number

/O = Display OLD Prices – toggle (full screen)

/OHH = Display On-Hand History for last 12 months

/ORD = Add to shopping list


/P = Display open Purchase Orders by Warehouse Code

/PRD = Display additional product file info


/PT = Display historical part-notes


/Q = Display Quote and other suspended/in-progress orders

/R = Display any Part Numbers that Supersede to this Number

/SN = Service Notes

/STAT = Show count of items by product-code in PRODCT file

/STATS= Show count of items by product-code in STOCK file


/U = Display any available UPC codes

/VA = Display On-Hand at alternate-vendors (if available)

/W = Display any available w/supers

/Z = Display additional Z-A-B data for whse

(partial-part#)? = Search on partial part number

(partial-part#)?=wh_cd = Search on partial part number, display OH for whse

?(partial-part#)? = Search on partial part# (anywhere in pt#)

?(partial-part#)?=wh_cd = Search on partial part# (anywhere in pt#), display OH

(part-desc)/DES=wh_cd = Search on partial part# description, display OH

The “full” screen shows much more detail about the part number. Here’s an example:

Toggling between the “short” and “full” screen is done by typing a “/S” (toggling from full to short) or “/F” (toggling from short to full).

/COST = Display the unit cost – toggle

Select Order Inquiry / Reprint (option # 11 from the main menu)
You can inquire on orders by customer number, order number, customer purchase order number, order date, invoice date, ship warehouse, order type, salesman, and several other ways. The most straight forward is by customer number. At the “Cust No” prompt, type the customer number <enter>.

At the “Order_No” prompt, type “0” <enter>.

At the “Month” prompt, type the first three letters of the month you want (example: JAN, FEB,MAR, etc.) and <enter>. “ALL” defaults to the last 13 months.

Select the appropriate option:
· C Continue to the next screen (if applicable)
· F Fax or Email invoices, credits, quotes, RMAs, etc.
· L Allows you to list and/or edit an order’s contents
· L/R Allows you to list and/or edit an order’s contents then return to this screen
· V Allows you to view an order and inquire/search for specific elements
· P Allows you to reprint an order, invoice, credit, quote, RMAs, etc.
· S Allows you to stop and inquire on other orders
· X Exits to main menu
· /CR Enter/inquire on customer call reports
Additional search capabilities are available at each of the respective prompts:
| At the customer number prompt – you typically display orders for ship-to customers. Add a ‘/N’ to also display the ship-to name on the screen. Add a ‘/B’ to inquire by the bill-to account instead of the ship-to account. | |
| At the order number prompt – enter the order number or type ‘0 <enter> to start the search. | |
| At the customer PO No prompt – add ‘?’ to search by a partial PO (example: 1234?). Enter ‘/D’ to search by a dollar range. Add ‘/C’ to display customer number. Enter ‘username/U’ to display by user entering the orders. Enter ‘order-type/O’ to display by order type of orders. Enter ‘ship-via/V to display by ship-via of orders. Enter salesperson/S to display by salesperson code of orders. Enter terms code/T to display by terms code on orders. | |
| At the Ordered prompt – enter date and you can display orders created (B)efore, (A)fter, or (O)n the date. | |
| At the Shipped prompt – enter date and you can display orders shipped (B)efore, (A)fter, or (O)n the date. | |
| At the Ship Warehouse prompt – enter the shipping warehouse to display orders shipped from that warehouse. | |
| At the Status prompt – enter the special value to display orders with a specific status (example: Inv – orders that have been invoiced, Crd – credit memos, etc.). |


| At the Month prompt – enter ‘All’ to display all orders for the current and previous 12 months, enter ‘Jan/01’ to display all orders for January 2001, etc. |
Once the orders are displayed, you can use any one of the previously mentioned options to email, fax, print, list, view and/or search a specific order.

When viewing a specific order/invoice/credit, you have various command prompt options available.


The Customer Name Inquiry allows you to search for customer account information by specific criteria or a combination of criteria. In addition, the module provides search capabilities for customer referral information, mass merchant assignments, school attendance information, school personnel information, customer profile information, retail customer information, zip code based territory assignments, and customer call report inquiry/additions.
Select Customer Name Inquiry (option # 12 from the main menu)

At the prompt, you may inquire by:
· Type (whse comma)<enter> (1,<enter>, displays all whse 1 customers)
· Type (namekey)<enter> (AA<enter>,displays all customers with AA namekey)

· Type (.city)<enter> (.PORT<enter>,displays all customers in a city beginning with PORT)

· Type (..state)<enter> (..OR<enter>,displays all customers in Oregon)

· Type (…zip code)<enter> (…<enter>, displays all customers in a zip code beginning with 973)

· Type (….phone)<enter> (….503-393<enter>,displays all customers with a number beginning with 503-393)

Other functions available at this prompt are:
· /(number) Takes you directly to that option on the main menu
· /R Customer referral inquiry – lookup a service dealer based on several criteria, i.e. city, county, state,
zip code, geozip, etc.

· /M Mass Merchandiser inquiry – lookup a service dealer based on the mass merchant I.D. and
store number.

· /C Customer information inquiry – lookup customer information, i.e. contact names, address, phone,
fax, cell number, email, website, dealer I.D. number, contract type, etc.

· /S School attendance inquiry – lookup school schedules, locations, dates, attendance, etc.

· /P School personnel inquiry – lookup student school attendance, personal and professional
information, etc.

· /F Customer Profile inquiry – lookup customer profile information, i.e. business trends, lines carried,
lines serviced, store size, equipment, computer capabilities, etc.

· /N Retail customer inquiry – lookup retail customer information, i.e. address, phone, email,
last five purchases, etc.

· /T Salesperson search by zip code – lookup salesperson covering a specific area by zip code.

· /CR Customer call report inquiry/update – lookup/create a customer report for a customer that can
be searched by customer/username/date, flagged for follow up and categorized by call type.
Select View A/R Statement (option # 13 from the main menu)

Enter the customer number you want to display.

Type a “?” and press <enter> at the command prompt for other options while viewing.

The following options are available at the "FUNCTION" prompt.
Type "?" <enter> to view a popup display of these special options.
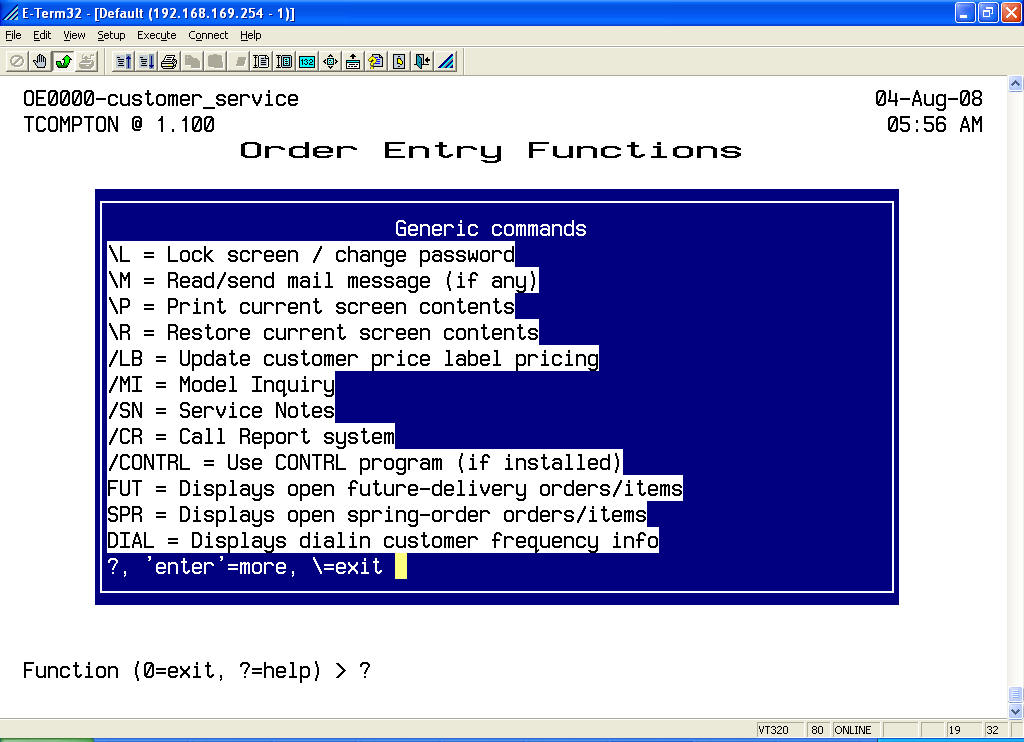
\L allows a user to lock (disable) the session without logging out..
\M allows a user to read/send CODIS mail messages.
\P allows a user to print screen contents.
\R allows a user to "refresh" screen contents.
/LB allows a user to update customer price label matrices (not used by all CODIS users).
/MI allows a user to access the Model Inquiry module.
/SN allows a user to access the Service Notes module.
/CR allows a user to access the Call Reporting module.
/CONTRL allows a user to launch the "user assistant" program (not accessible by all CODIS users).
FUT displays items on future delivery orders.
SPR displays items on spring id orders (these order were entered using the spring id order option).
Dial displays Dialin/Persona usage by customer.
more options.........................
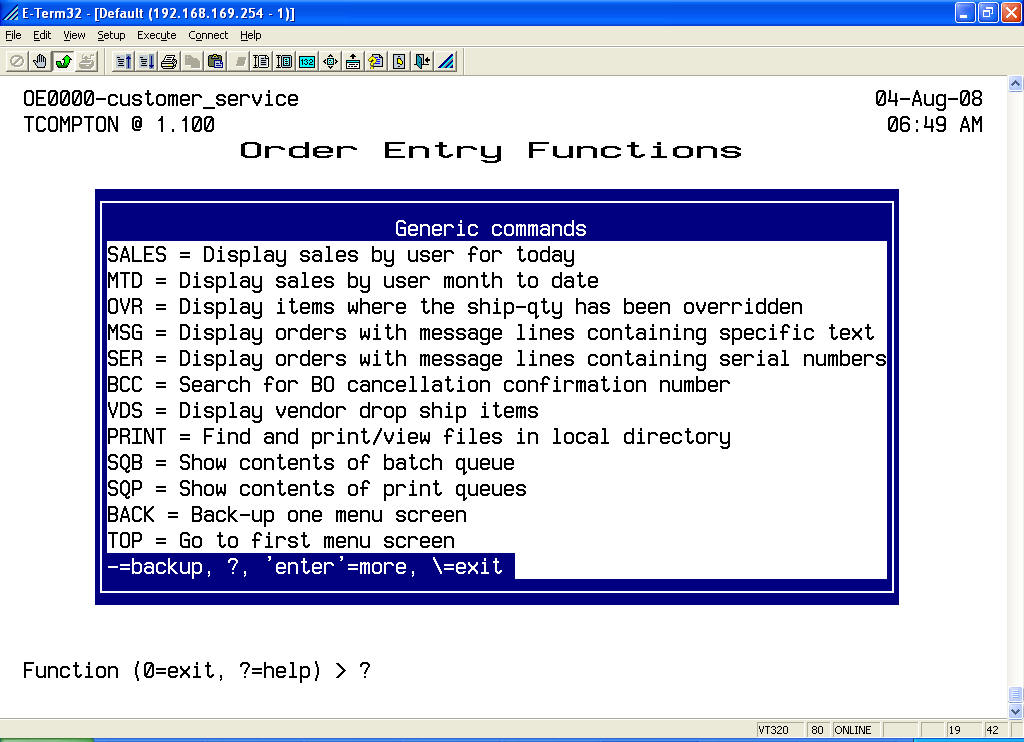
SALES displays sales by user for the current day's business.
MTD displays sales by user for the current month's business.
OVR displays items where the quantity shipped on an order was less than the quantity that was originally allocated.
MSG displays orders containing specific message text.
SER displays orders containing specific serial numbers (usually whole goods).
BCC displays information relative to a specific backorder cancellation.
VDS displays vendor drop ship information.
PRINT allows the user to print/view files from their local directory.
SQB displays batch queue information.
SQP displays print queue information.
BACK allows the user to backup one menu screen.
TOP allows the user to go to the main menu.
more options.........................
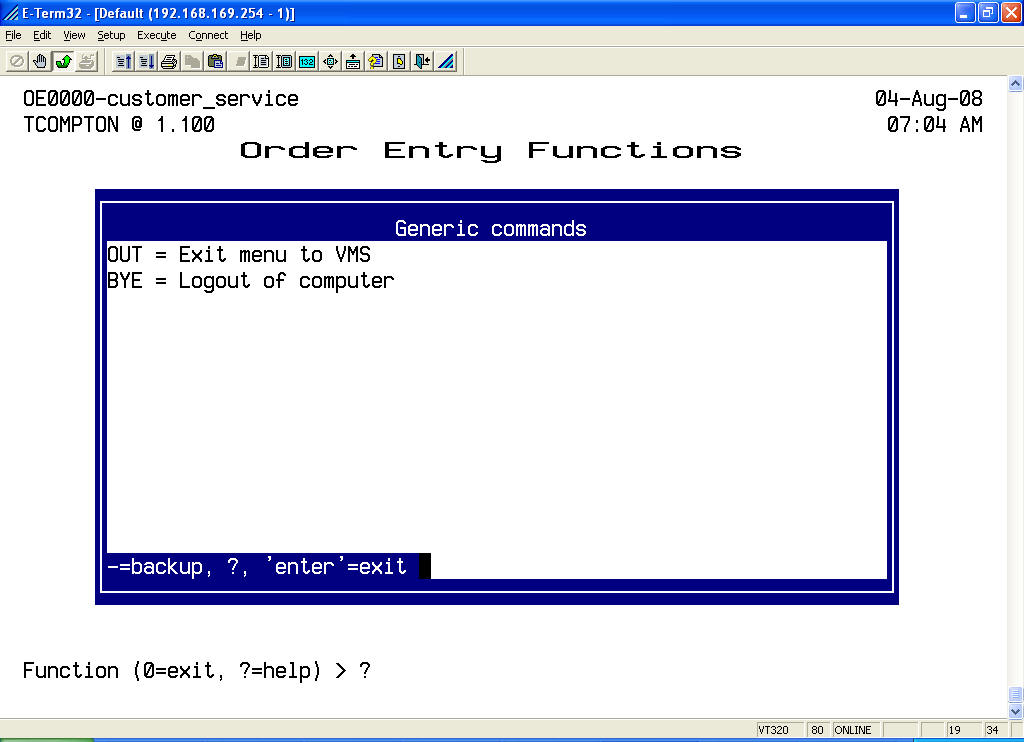
OUT exists the menu to a VMS prompt (when the user as such privileges).
BYE logs the user out of the session.